String Change Assistant
Pre-Flight
Checklist
Before we start, make sure you have everything you need. Check off each item or tap "I have my tools" to continue.
Step 1 of 9
Your Setup
Tell us about your guitar so we can tailor every step to your exact situation.
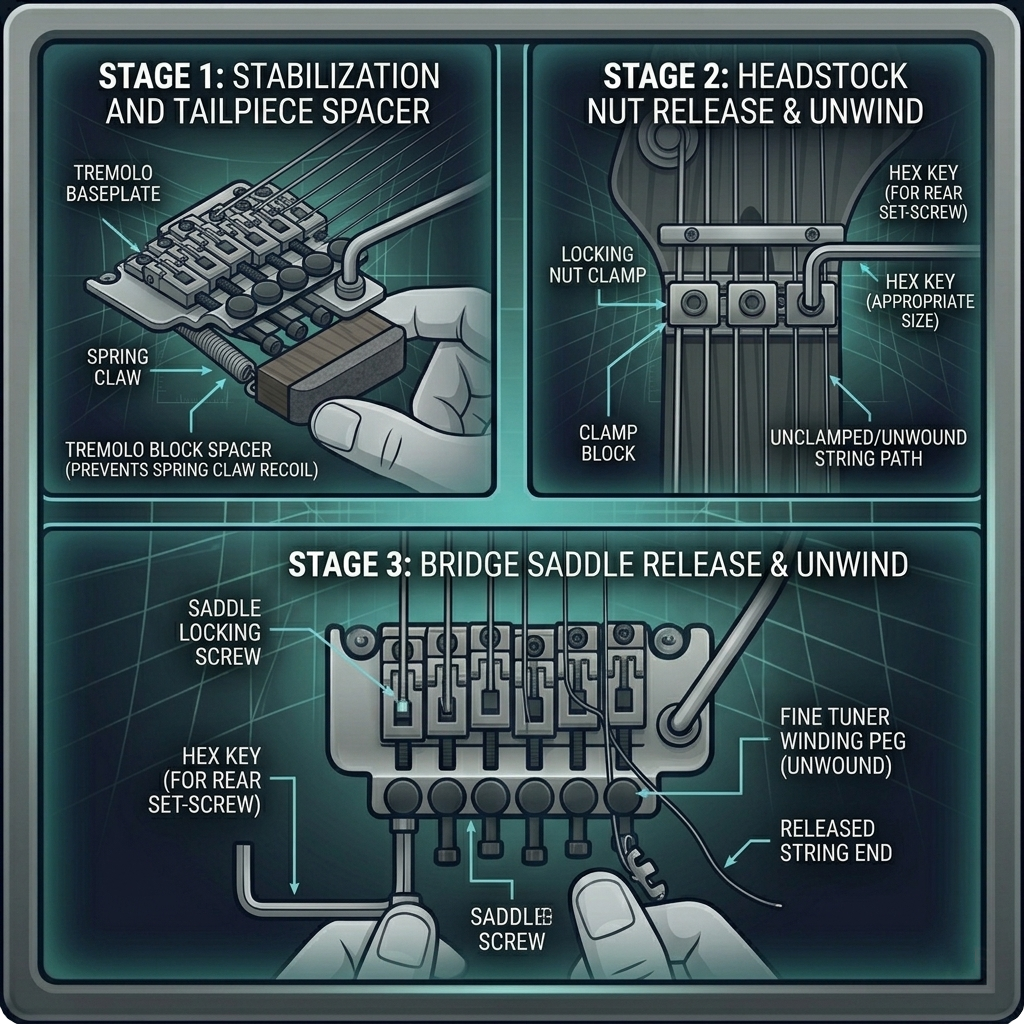
Release the Tension
Use your string winder to completely slacken all 6 strings until they hang loose from the posts.
Work string by string — there is no rush here. The neck has been under tension and needs to be relieved slowly.
Never cut strings under full tension. The sudden release can shock the neck, shift the truss rod, and send a flying string end into your finish or your eye. Always slacken first.
Remove the Strings
The Naked Clean
With all strings removed, this is your best opportunity to clean the fretboard. Wipe down every fret and the wood between them with a microfiber cloth.
Remove any buildup of skin oil and grime that has accumulated under the strings.
Take your time here. A clean fretboard feels completely different under the fingers and will make the new strings feel even better.
Feed the String
Work one string at a time, starting from the thickest (Low E) and working toward the thinnest (High e).
Anchor the ball-end securely at the bridge. Pull the string up along the neck and pass it through the eyelet of the tuning post shown below.
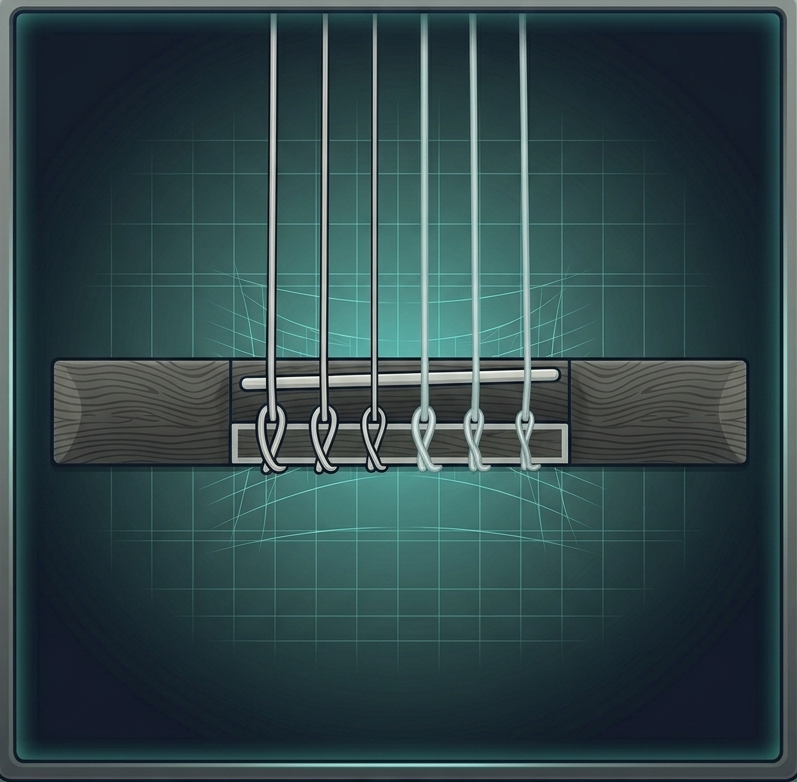
Leave all excess wire sticking out of the headstock until all 6 strings are installed and brought to pitch. If a string ends up on the wrong post and you clip early, the wire may be too short to re-wrap. Double-check gauge order — thickest at Low E, thinnest at High e.
Set the Slack
Pull the string completely taut through the post. Now push it backward exactly one fret distance — roughly 1 to 1.5 inches — to introduce the right amount of slack.
This slack is what gives you 2–3 clean, non-overlapping wraps around the post. Too little slack means too few wraps. Too much means sloppy overlapping coils that slip.
Wind All 6 Strings
Repeat this for all 6 strings — one at a time, in order from Low E to High e.
Guide the first wrap above the hole entry point, then all subsequent wraps below it. This locks the string in place and creates a steep, buzz-free break angle over the nut.
Bring to Pitch
Bring all strings up to a rough tuning pitch. Work through all 6 strings in order — low to high — before fine-tuning any individual string.
Always tune up into pitch from below — never down from sharp. If you overshoot, wind the peg down until the string is clearly flat, then wind back up to lock the gears.
Time to Clip
All 6 strings are on and roughly in tune. Now is the right time to trim the excess wire.
Do a final check — run your eye from Low E to High e and confirm each string is seated on the correct post in the right gauge order before making any permanent cuts.
Use your wire cutters to cleanly clip the excess wire 2mm above each post hole. Fold each stub down carefully — a sharp end pointing upward is a hazard.
Clip one string at a time and fold the stub before moving to the next. This prevents loose wire ends from scratching your finish or headstock.
Stretch & Tune
Give each string 3 gentle manual pulls away from the fretboard at the 12th fret to clear out physical slack. Retune after each round of stretching.
Repeat the stretch-and-tune cycle until the strings hold their pitch reliably after each pull.
Instead of tuning down and coming back up, pull the string up with your picking hand while fretting firmly at the 12th, 7th and 3rd fret. The added tension will stretch the string and lower its pitch — retune and repeat until it holds steady.
New strings need 3–5 tuning cycles before they fully settle. Don't be surprised if they drift in the first hour of playing — this is normal. Just retune and keep playing.
String Change Complete
Fresh Strings.
Ready to Play.
Your guitar is restrung, stretched and trimmed. Here are your next steps: