Setup Guide
Guitar Action 101: How to measure & Adjust String Height
Guitar action is simply the height of the strings above the frets. If the action is too high, the guitar can feel stiff and tiring to play. If it is too low, the strings may buzz against the frets when you pick or fret notes.

Getting the action right is one of the biggest differences between a guitar that fights you and one that feels easy to play. But action does not live in isolation — it works together with neck relief, nut height, and final intonation.
Do relief first, then nut height, then action, and save intonation for last. If you change action afterward, you may need to revisit intonation again.
Measure the Action
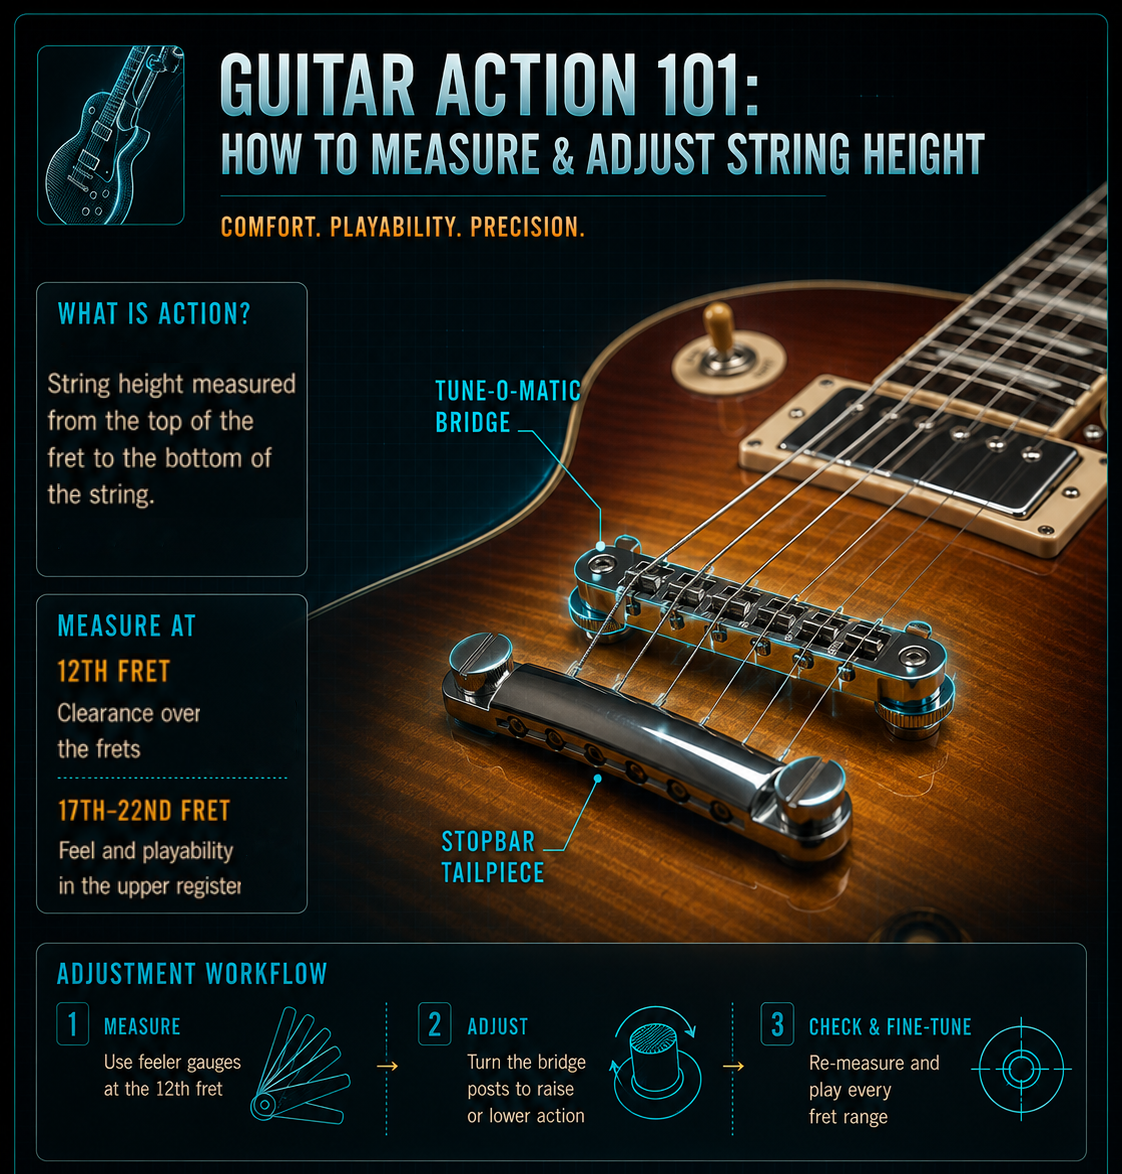
The most common place to measure action is at the 12th fret. Tune the guitar to pitch, place a ruler or action gauge directly on top of the 12th fret wire, and measure the gap from the top of the fret to the bottom of the string.
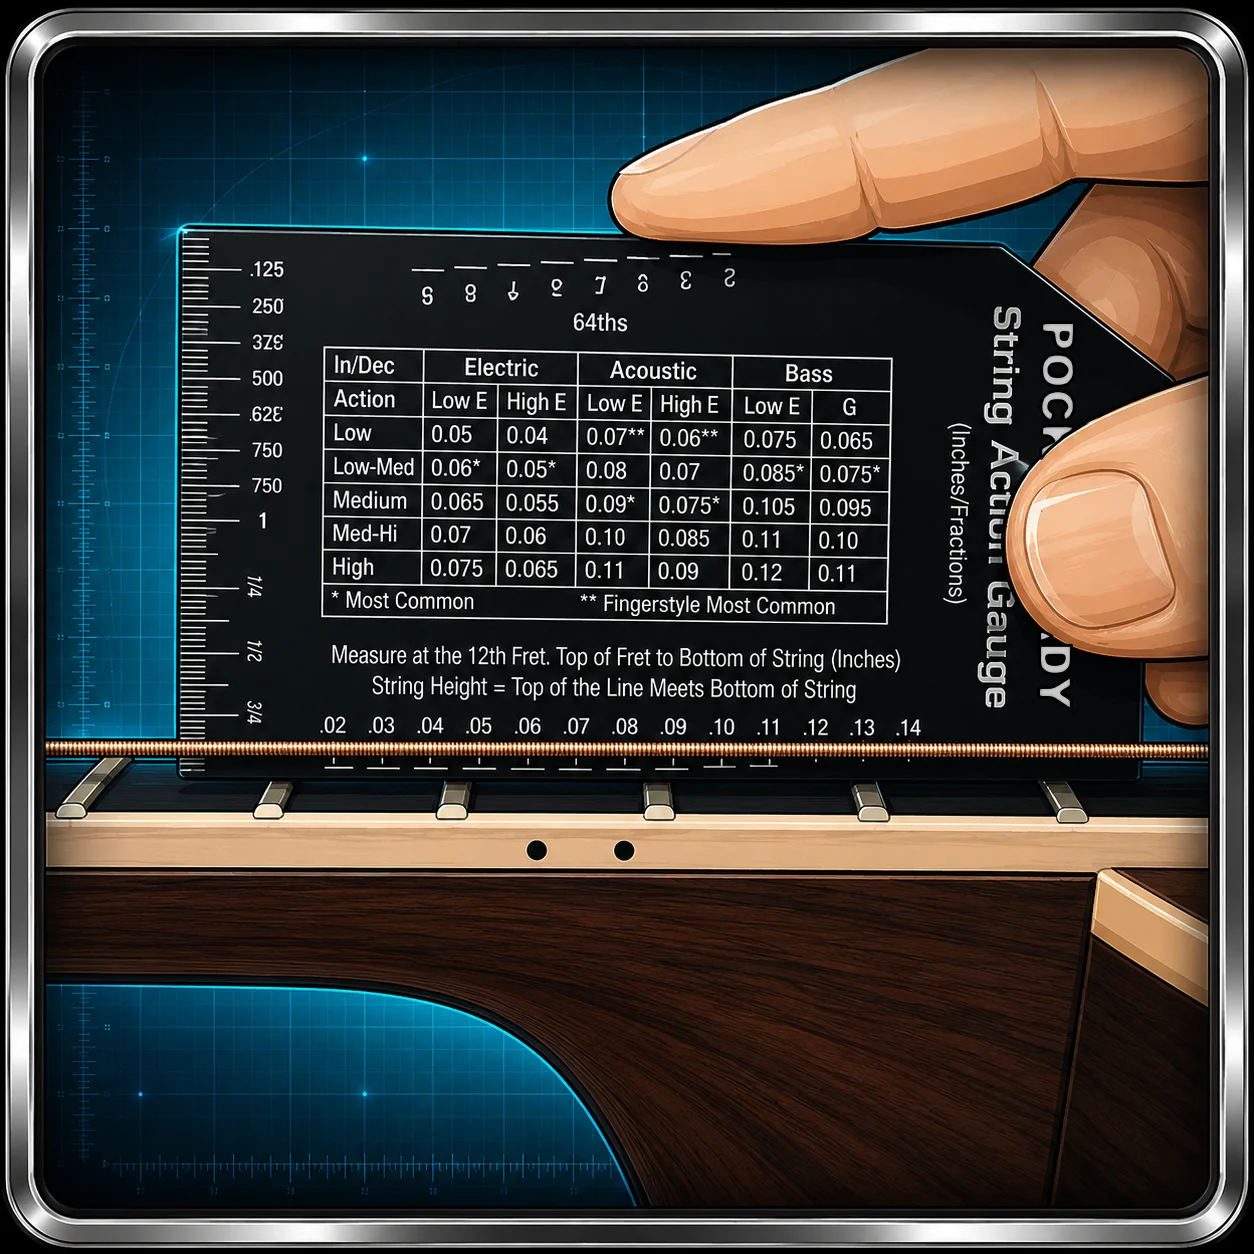
Check both the low E and high E strings, since the bass side is usually a little higher than the treble side. For most players, a comfortable starting point is around 4/64" on the low E and 3/64" on the high E for electric guitar, with acoustic and classical guitars usually sitting higher.
Measure from the top of the fret wire, not the fretboard wood. That small detail makes a big difference in getting a repeatable reading.
What the Numbers Mean
Action is not a one-size-fits-all setting. A light-touch electric player may prefer lower action, while a heavy strummer or acoustic player may want a little more room for the strings to move.
| Guitar Type | Low E | High E |
|---|---|---|
| Electric — Light | 3/64" (1.19 mm) | 2.5/64" (0.99 mm) |
| Electric — Balanced | 4/64" (1.59 mm) | 3/64" (1.19 mm) |
| Electric — Heavy | 5/64" (1.98 mm) | 4/64" (1.59 mm) |
| Acoustic — Light | 5/64" (1.98 mm) | 3.5/64" (1.39 mm) |
| Acoustic — Balanced | 6/64" (2.38 mm) | 4/64" (1.59 mm) |
| Acoustic — Heavy | 7/64" (2.78 mm) | 5/64" (1.98 mm) |
| Classical — Light | 8/64" (3.18 mm) | 6.5/64" (2.58 mm) |
| Classical — Balanced | 9/64" (3.57 mm) | 7.5/64" (2.98 mm) |
| Classical — Heavy | 10/64" (3.97 mm) | 8.5/64" (3.37 mm) |
If your guitar feels good and does not buzz, that matters more than chasing a number just because it looks tidy on paper.
Numbers are a starting point, not a personality test. The best action is the one that matches how you actually play.
Adjust Fender-Style Saddles
On a Fender-style bridge, each string usually has its own saddle. To lower action, turn both height screws on the saddle evenly so it stays level. To raise action, turn them the opposite way.
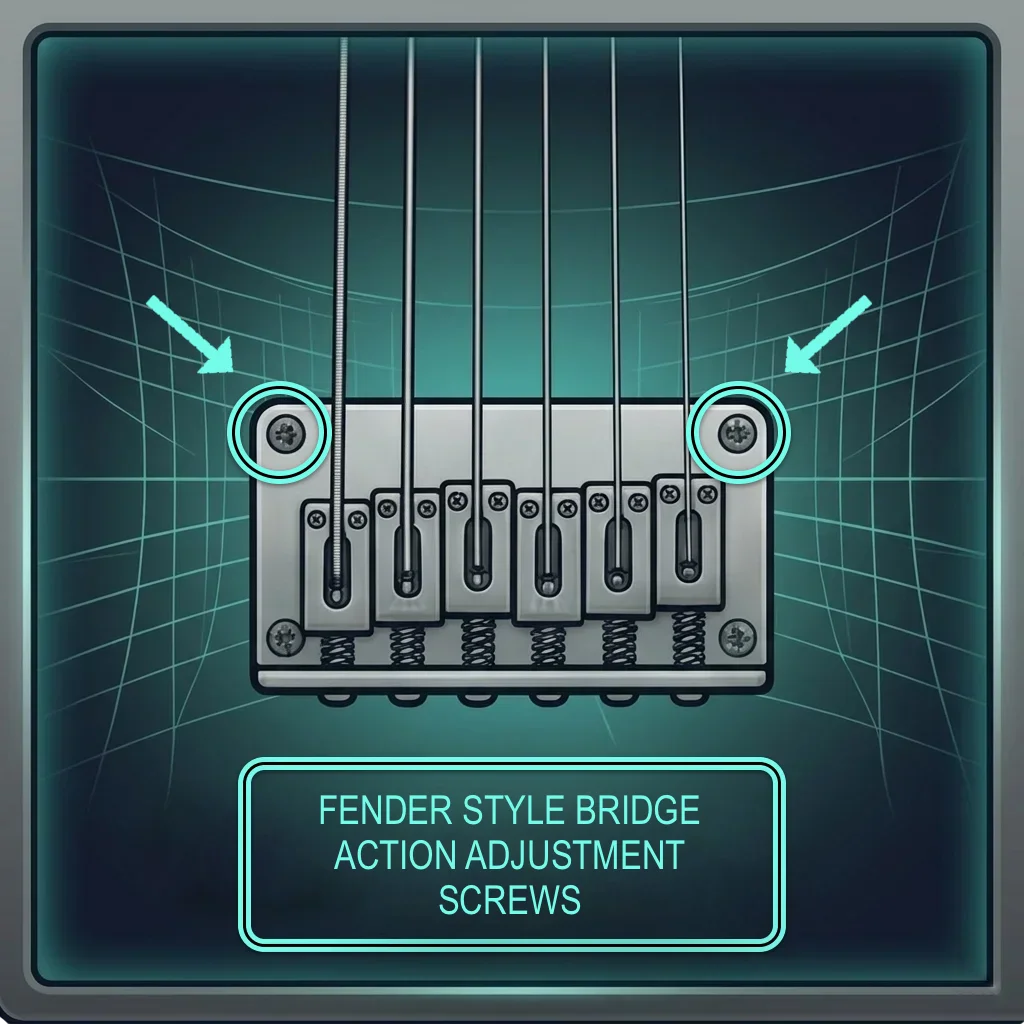
Keep the saddle balanced as you adjust it. If one side sits higher than the other, the saddle can tilt and make the setup feel uneven.
Small, even turns are better than big moves. Keep the saddle flat and check your progress often.
Adjust Tune-O-Matic Bridges
On a Tune-O-Matic bridge, action is usually set with the bridge posts or thumbwheels. Lowering the bridge lowers the action, and raising the bridge increases it.
If the bridge is under full tension, make small changes and avoid forcing hardware that feels stuck. A little patience goes a long way here.
If the bridge hardware feels resistant, loosen the strings slightly before making a bigger height change. That keeps the bridge and finish safer.
Adjust Acoustic or Classical Action
On acoustic and classical guitars, action is usually changed at the saddle, not with bridge screws. To lower action, the saddle has to be removed and carefully sanded down at the bottom. To raise it, you usually need a taller saddle blank or a shim, depending on the guitar.
This is the part where you want to slow down. Acoustic saddle work is more permanent than turning a screw, so a small change matters a lot.
If you are sanding a saddle, take off a little at a time and check often. It is much easier to remove a bit more than to put height back later.
Recheck the Full Setup
Once the action feels right, play the guitar across the neck and make sure it still feels balanced. If you changed the action significantly, you may need to check intonation again as the final step.
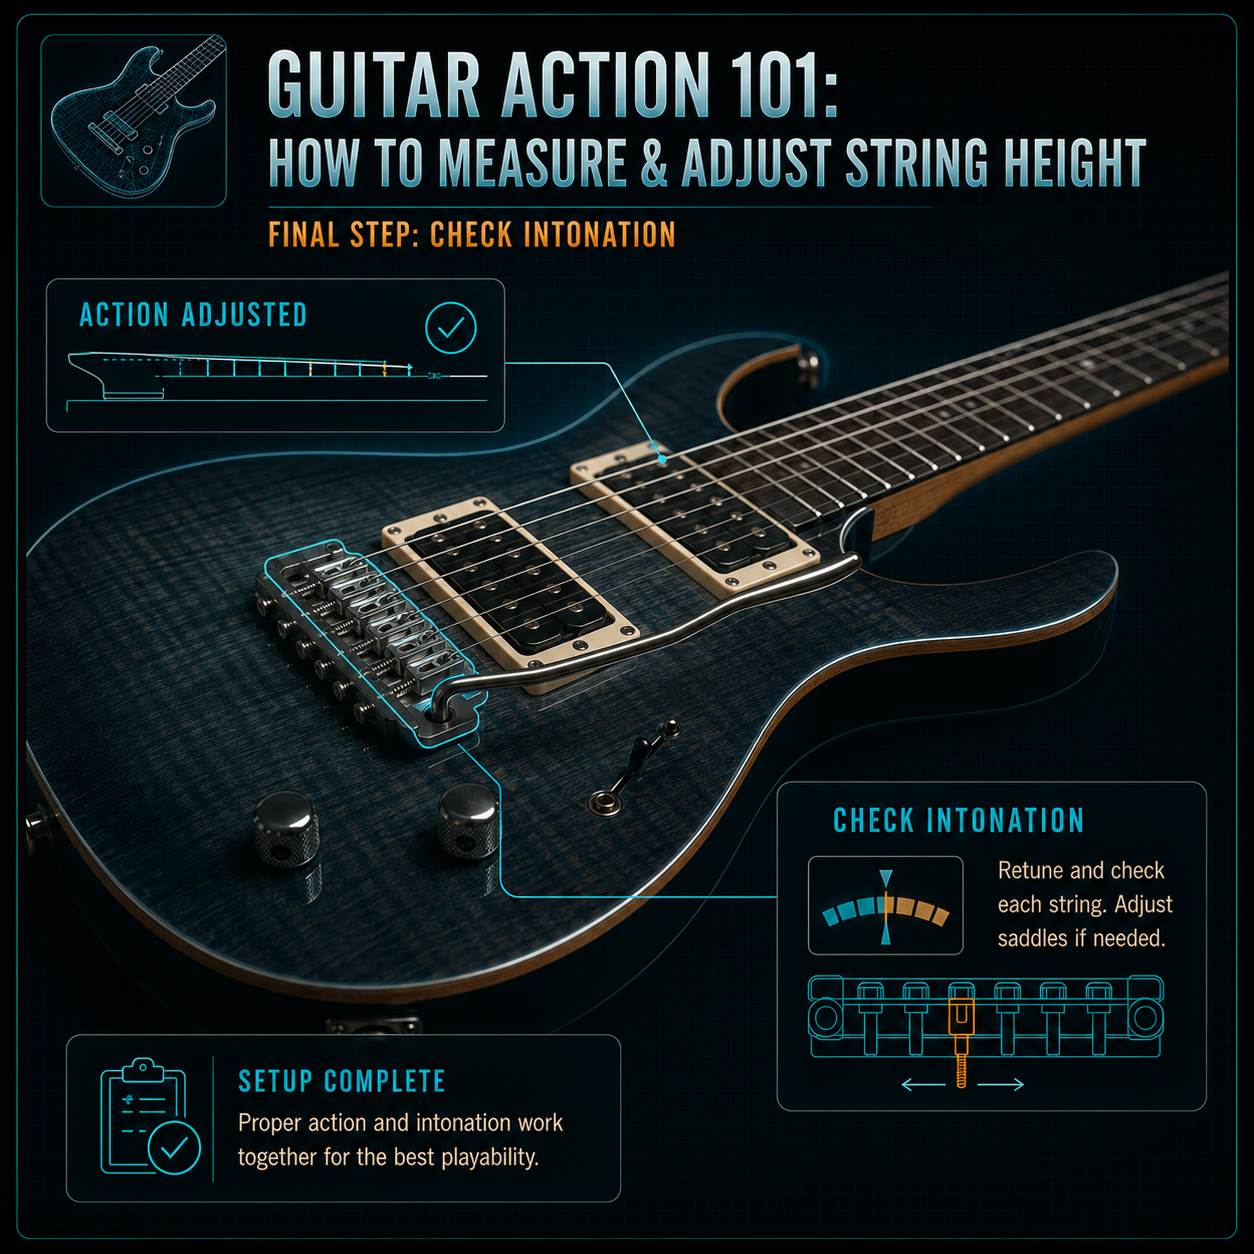
That is normal. Setup order exists for a reason, and action is one of the steps that can influence the next one.
Final Check
A good action setup should feel comfortable, sound clean, and match the way you play. If the guitar still buzzes, feels too stiff, or seems uneven from string to string, the answer may be in the earlier setup steps rather than the action alone.
Once the relief, nut height, action, and intonation all work together, the guitar usually starts feeling much more natural right away.
Next Step
If you want a faster way to check your numbers, use the Guitar Action Calculator. It compares your current readings against a practical target range based on your instrument and playing style.
Not sure where action fits in your overall setup? The Guitar Setup Assistant walks you through the full sequence from start to finish.
Want to check your numbers quickly?
Open the Guitar Action Calculator →