The Practice Hub Manual
Everything the Hub does, in the order you'll need it. Read it front to back the first time, or jump to the part you're stuck on.
- What the Practice Hub is
- Your first five minutes
- Exercises and methods
- The practice surface
- Routines and guided practice
- Putting your own practice in
- The five tools inside
- Songs, backing tracks and the audio player
- Intelligent Practice
- Preferences
- History, backup, and moving to a new device
- Shortcuts and small things
What the Practice Hub is
The Practice Hub is the ultimate guitar practice management tool. It is where your own practice lives — the exercises you are already working on, sorted, tempo-tracked and lined up in order — with a large library of ready-made drills sitting alongside them for whenever you want something new.
It does four jobs:
- It holds your practice. Put in what you are actually working on, give it a category, and you have an organized picture of everything on your plate instead of a list in a notebook.
- It decides what is next, so you do not spend the first ten minutes deciding.
- It remembers the details — the tempo of every shape, the section of the track you keep replaying, how far along you are with a song.
- And when you want more, five of Pocket Roady's tools are built right in, plus a starter set of exercises — so there is always something to reach for without switching tabs.
What it isn't. It is not a teacher and it will not tell you your playing was good. It does not grade you. And it is not a place to store your music library — your files stay on your computer, the Hub just points at them.
Where your stuff lives. Everything is saved in your browser, on your machine. No account, nothing uploaded, nothing to sign up for. That also means it is yours to look after — Chapter 11 covers backups, and it is worth reading before you have built anything you would hate to lose.
Your first five minutes
Start with something you are already working on. Whatever you would have practiced today anyway — a lick from a lesson, a song you are learning, a scale you keep fumbling — put that in first. The Hub is most useful when it is holding your own practice.
Here is the shortest path:
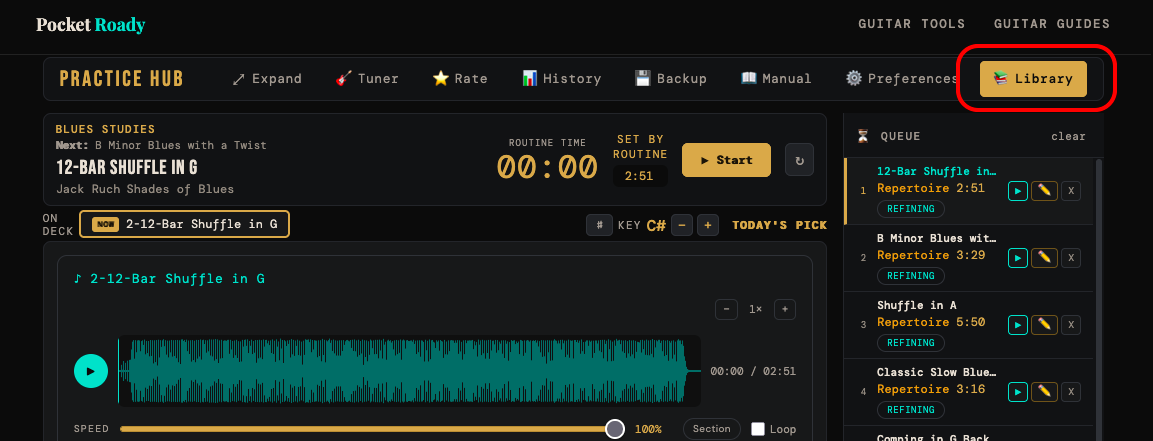
Press 📚 Library in the top right.
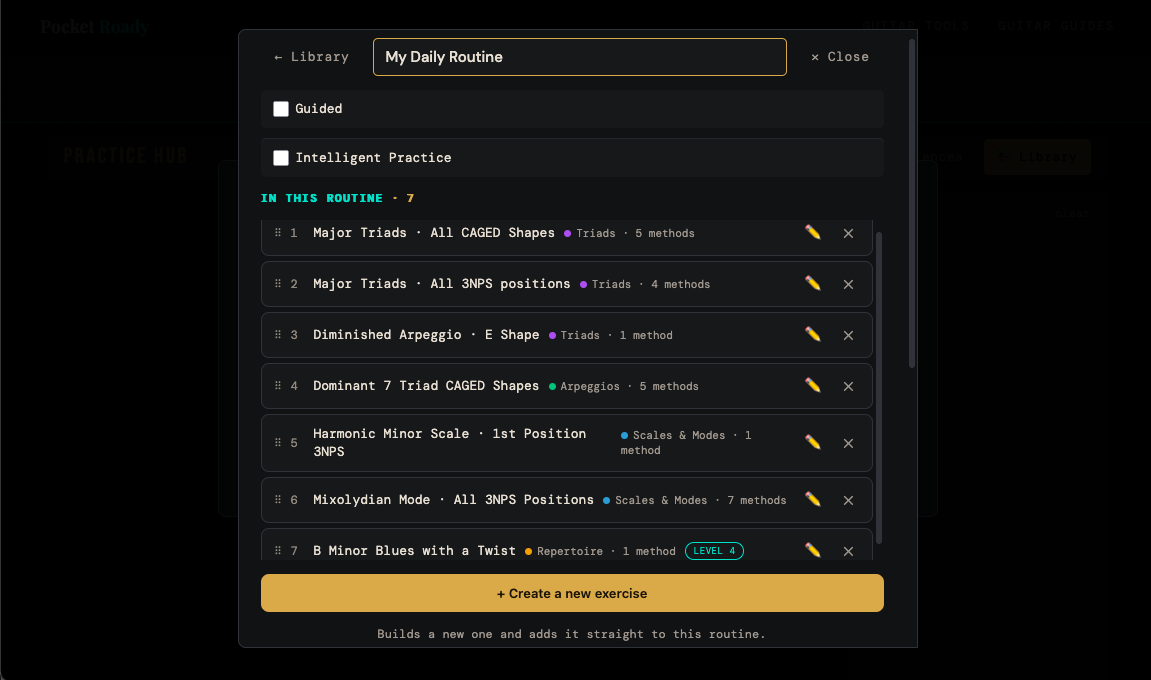
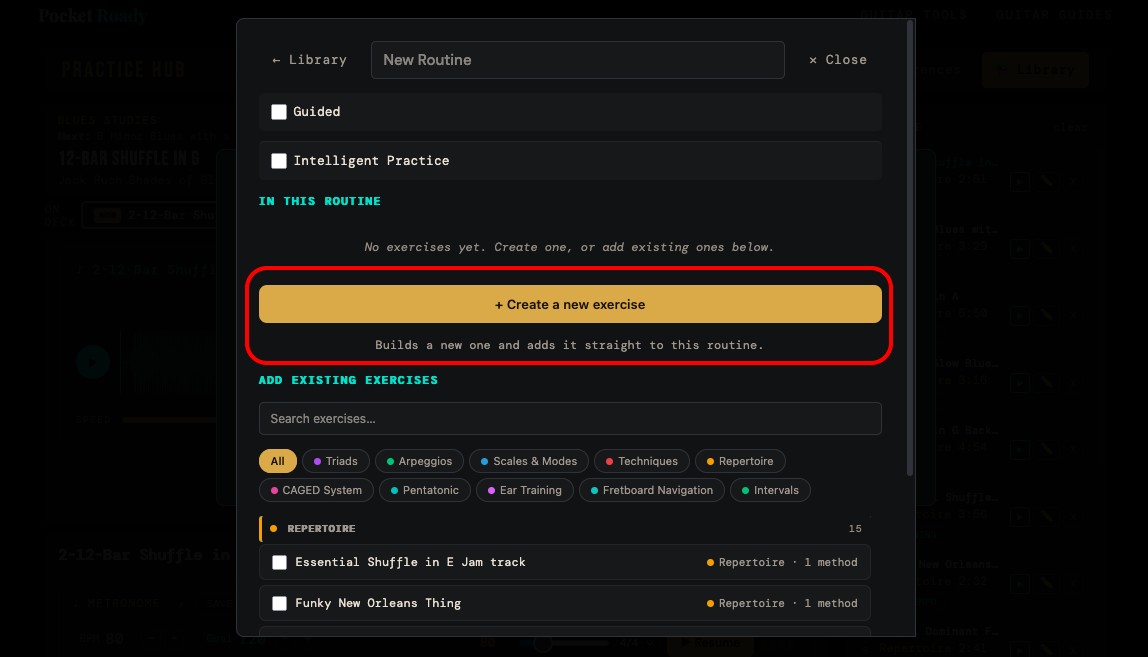
Press + New Routine, then + Create a new exercise.
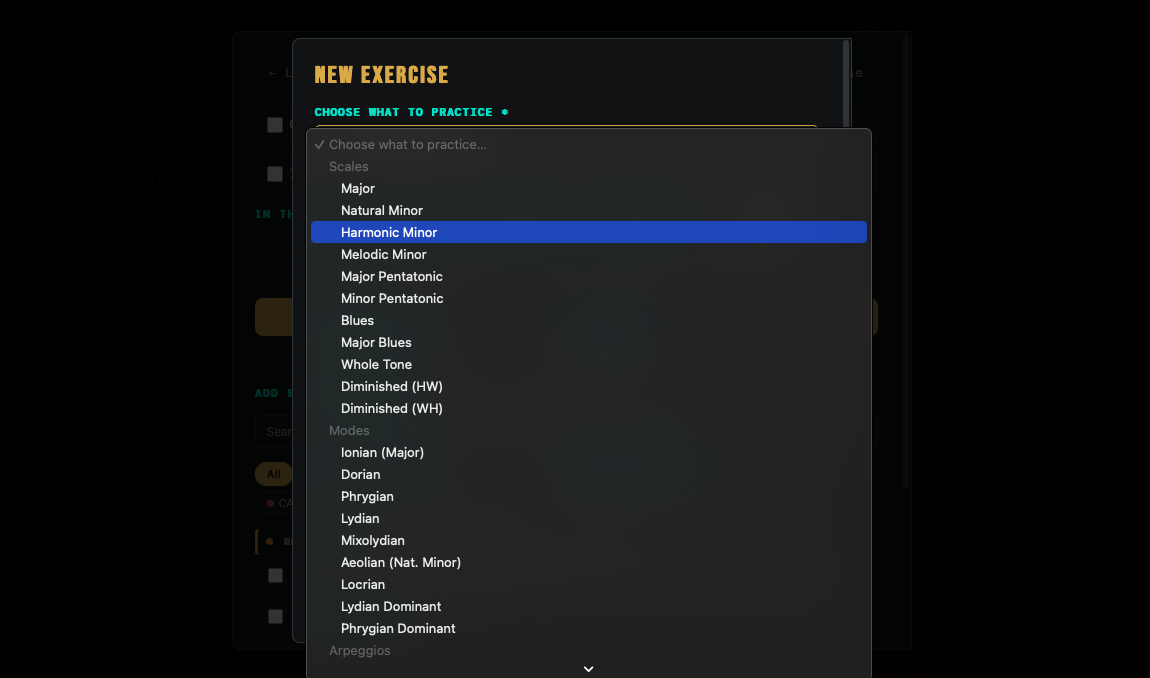
Choose what to practice — pick Exercise, Technique or Other if it is something of your own — name it, and add a method or two.
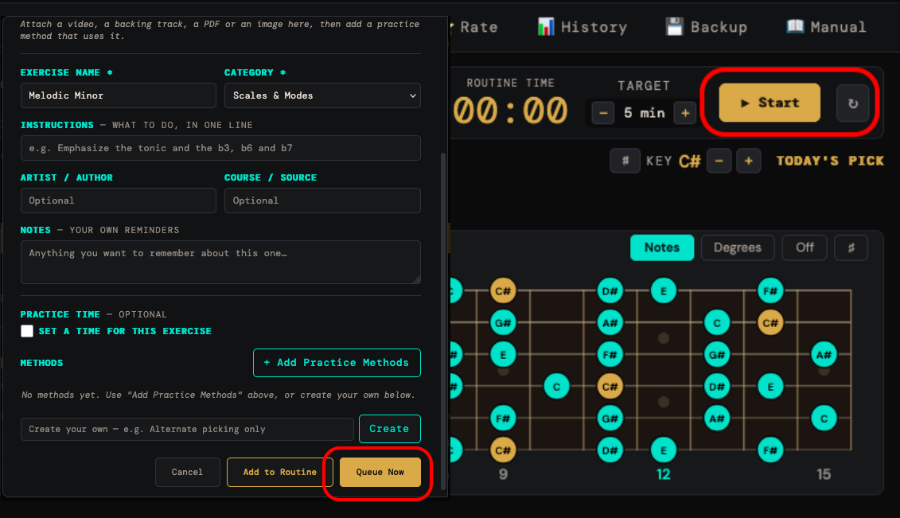
Press Queue Now to go straight to it, then press ▶ Start.
That is it. The click comes in with the session, the timer runs, and you are practicing.
And there is plenty already in here. The Hub ships with a large starter set covering scales, triads, arpeggios, intervals, CAGED and ear work. You do not have to use any of it — but it is there so the first screen is not a blank page, and so you can mix it in with your own whenever you want to shore something up. Browse it in the Library any time.
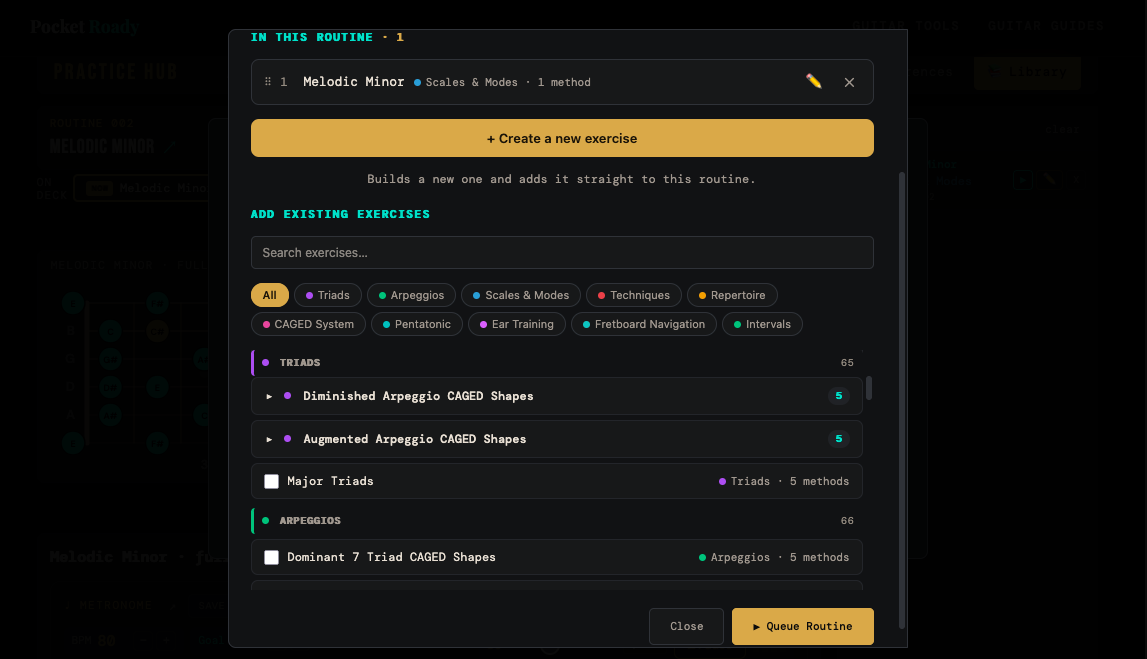
Three things to notice while you are there
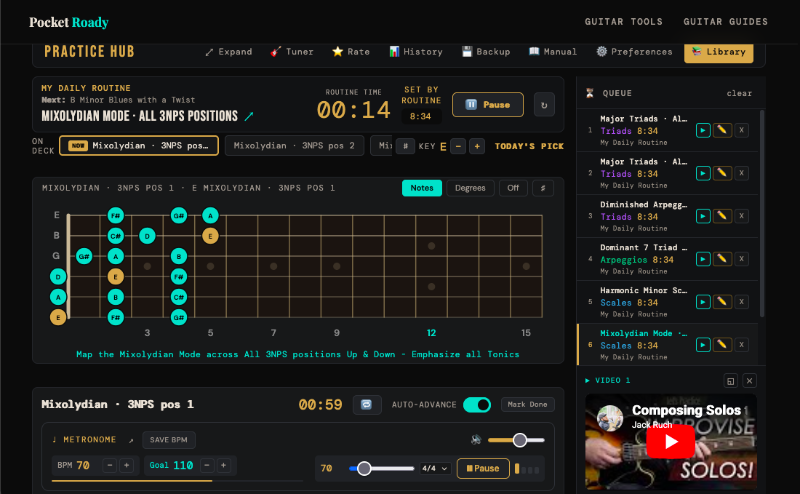
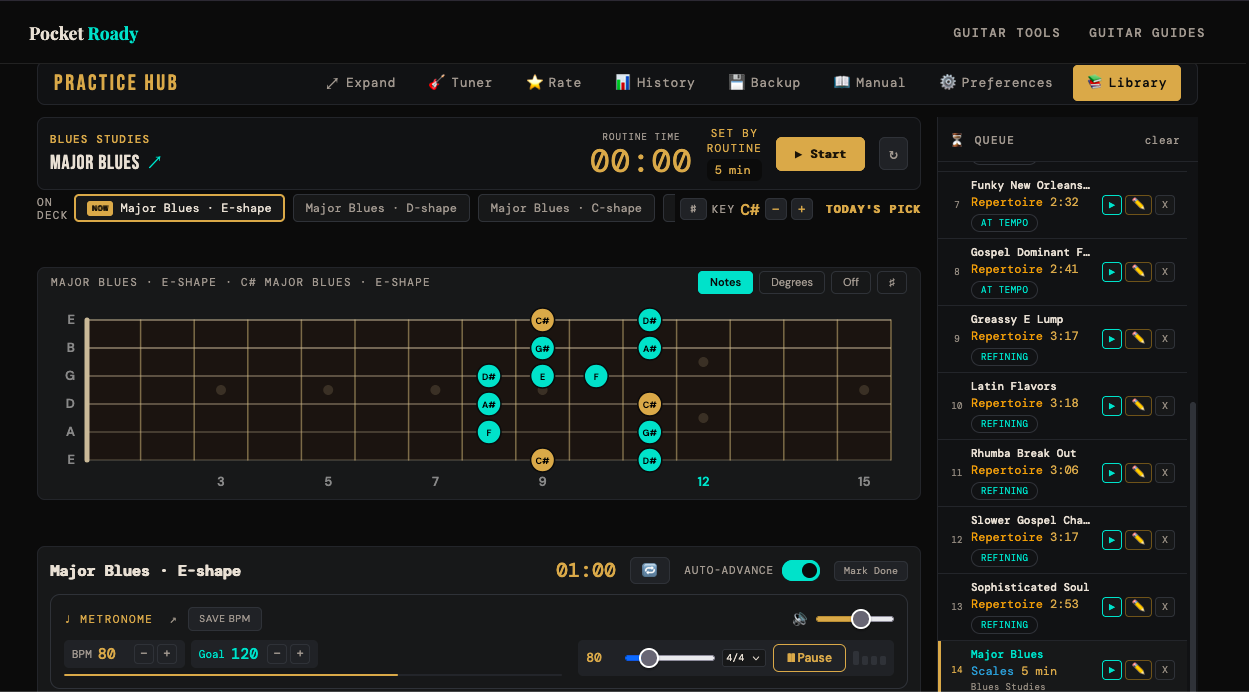
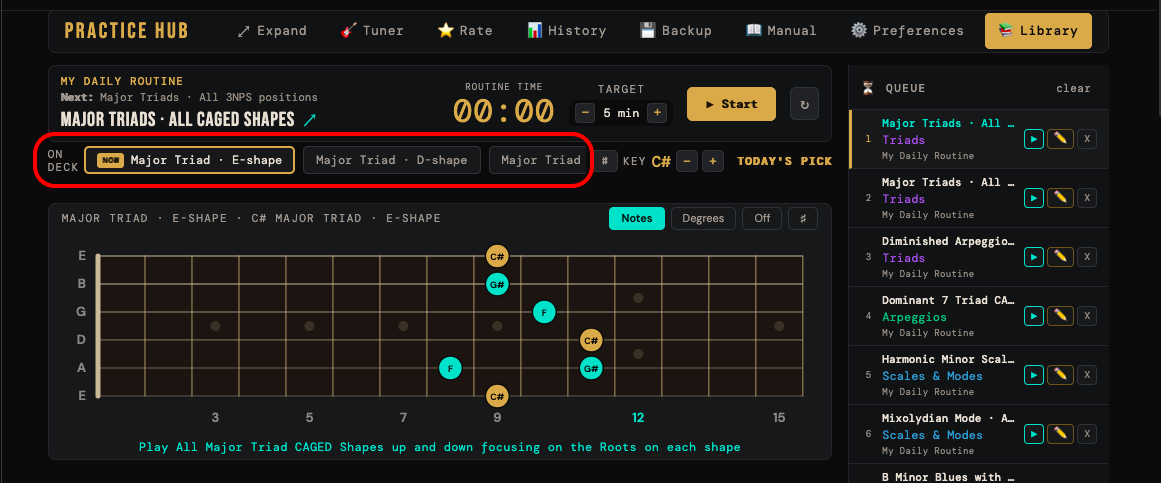
- The row across the top of the practice area is the on-deck strip — everything else in this exercise, waiting its turn. Tap any of them to jump straight there.
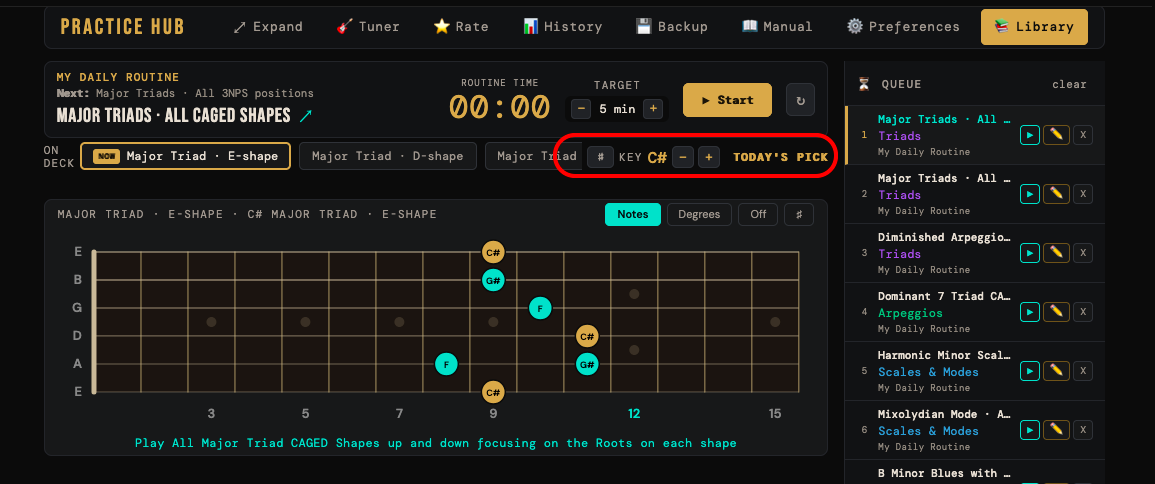
- KEY in that same row is today's key. The Hub picks one for you each day and rotates it. You can change it any time with the − and + buttons if you prefer picking your own key.
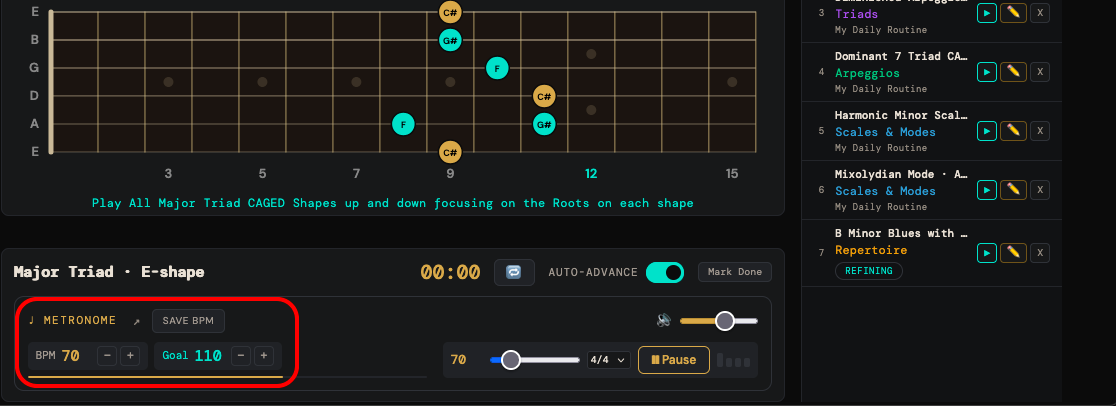
- Each card below the board has its own BPM. That is the whole idea, and it is Chapter 3.
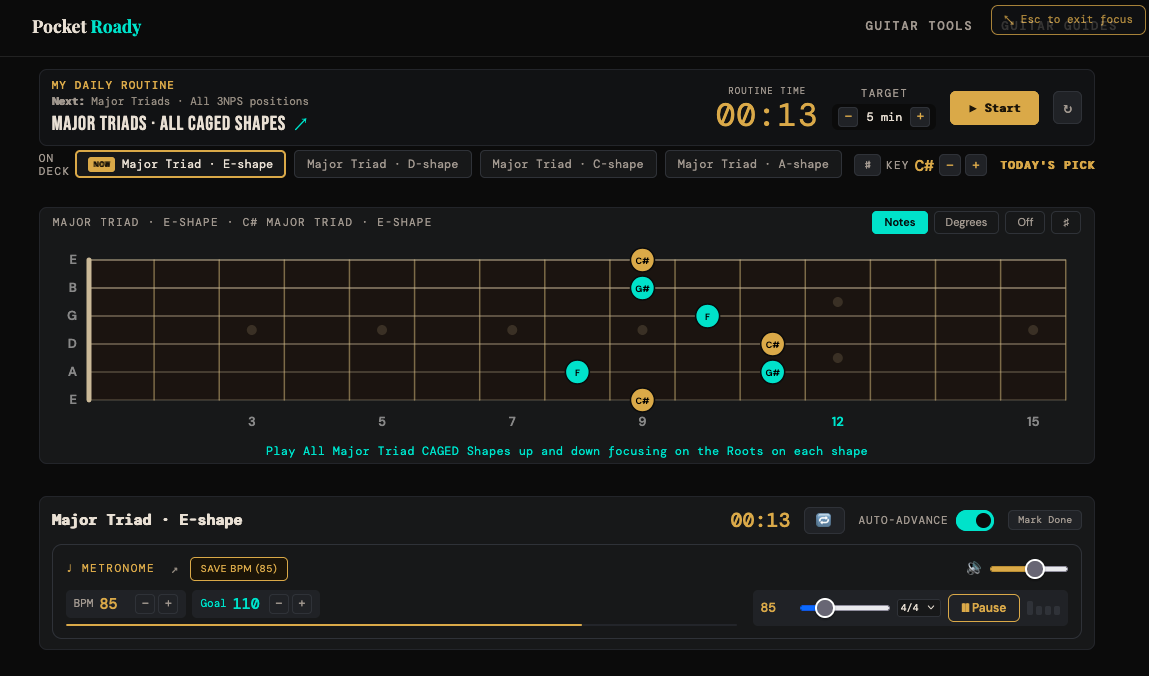
If it is too busy. Press ⤢ Expand (or just tap F). The side panels get out of the way and the practice takes the full width. Esc brings them back.
Exercises and methods
This is the one idea the rest of the Hub is built on. It is worth two minutes.
An exercise is what you are practicing. "Major Triads." "Blackbird." "Mixolydian."
A method is how you are practicing it. The E shape. The A shape. Strings 4-3-2. Slowly, with the backing track. Alternate picking only.
So one exercise usually holds several methods. "Major Triads" might hold all five CAGED shapes. "Blackbird" might hold the intro, the middle section, and a full run-through.
Why this matters: every method carries its own tempo and its own goal tempo. Your E shape might be comfortable at 120 while the G shape is still finding its feet at 80. You do not have to remember that — switch to the G shape and the tempo comes with it. The little bar under the number shows how far you have come toward the goal.
Building one
In the Library, press + New Routine, then + Create a new exercise. The form asks in this order:
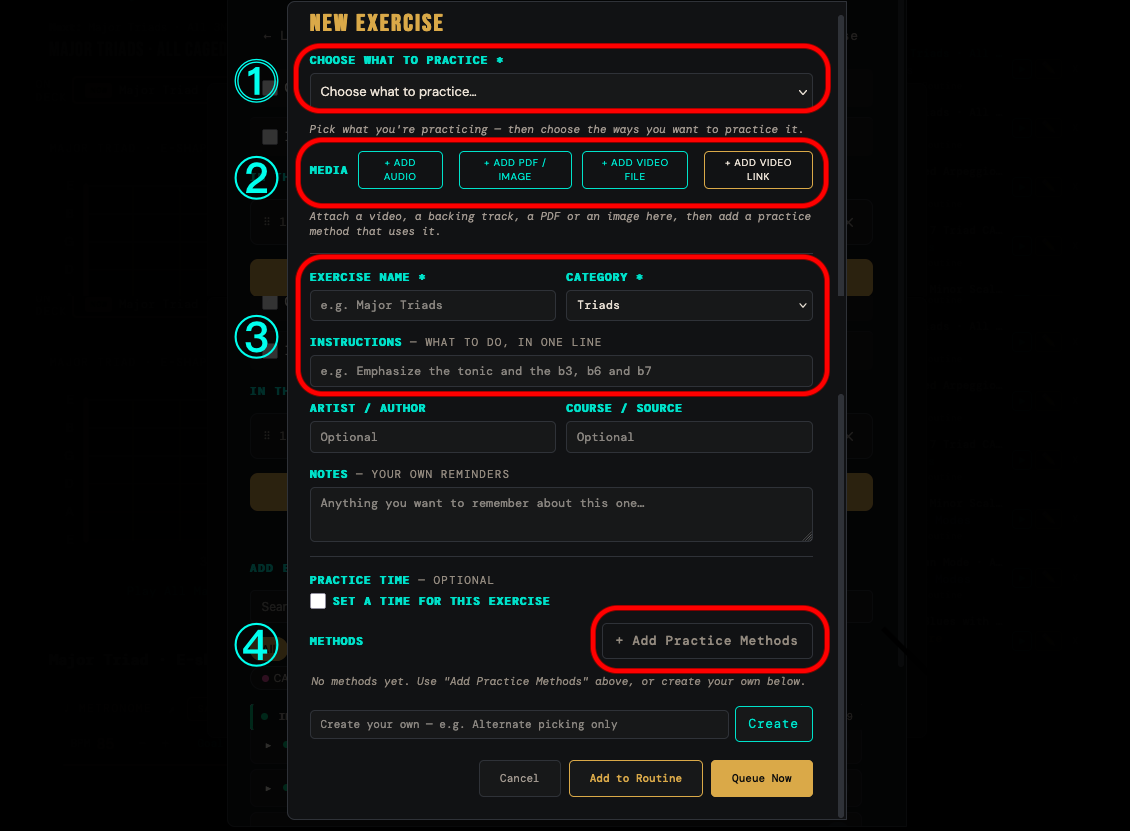
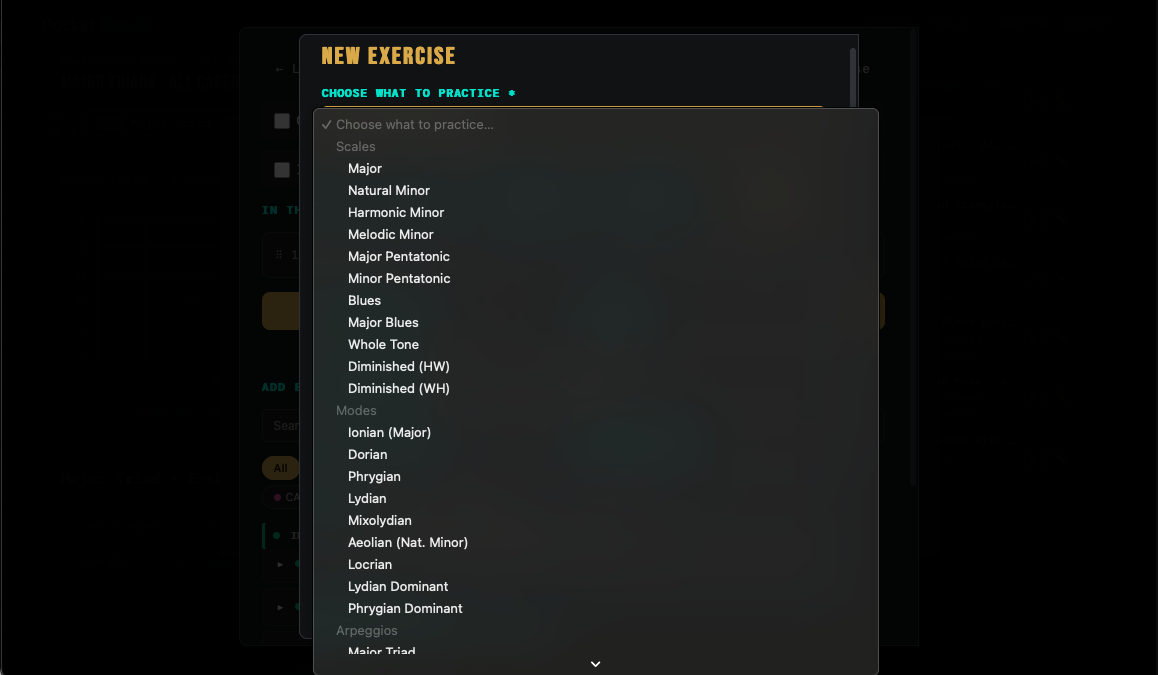
- Choose what to practice — your own exercise, technique or song, or a scale, chord, interval or one of the built-in tools.
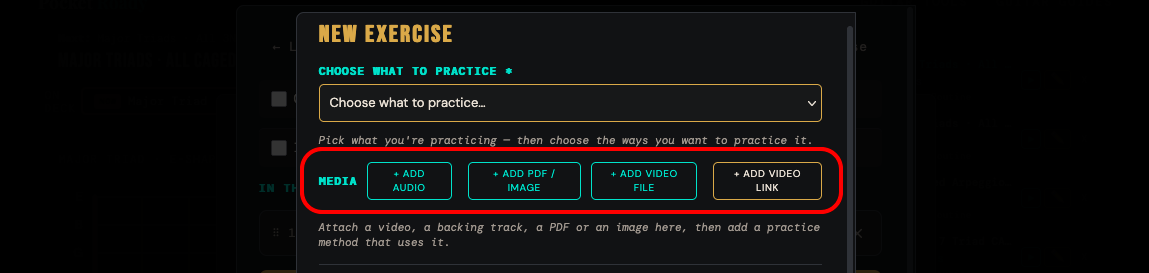
- Media — attach a video, a backing track, a PDF or an image if this exercise needs one.
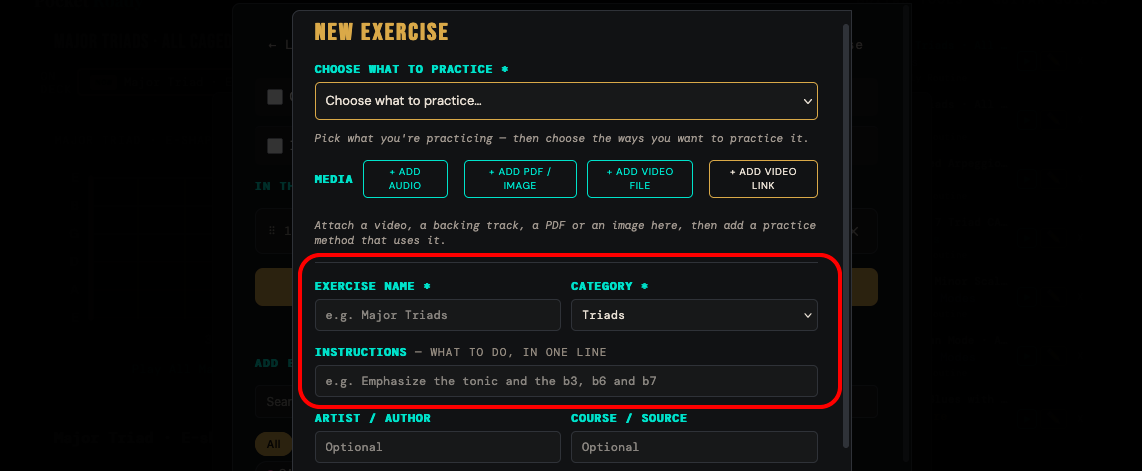
- Name it, pick a category, and add a one-line instruction — what to actually do.
- + Add Practice Methods — this is where you choose the hows.
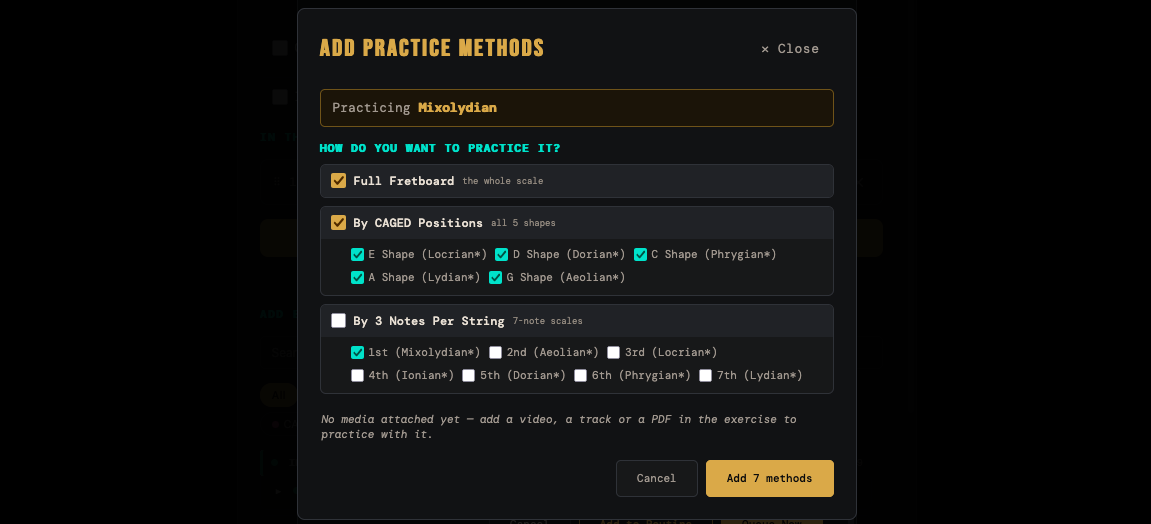
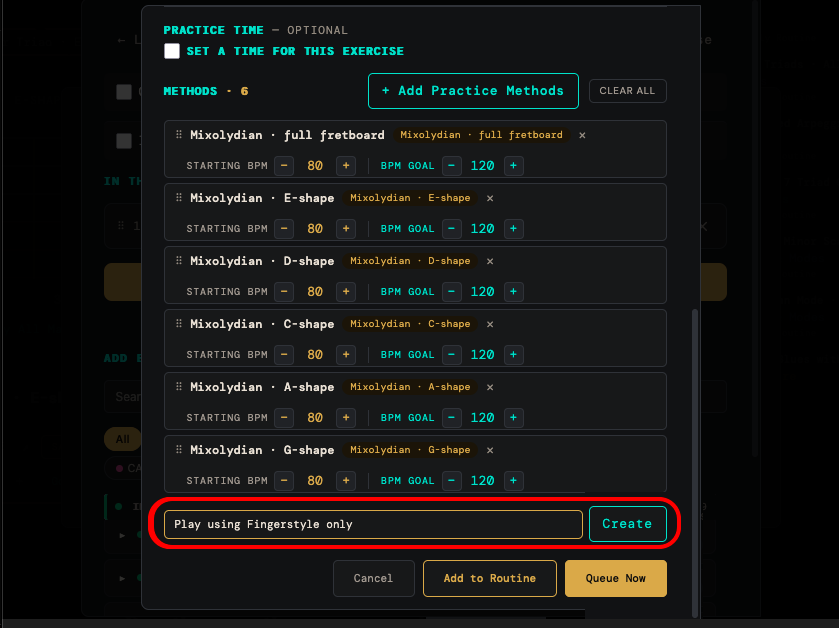
Two ways to add methods. The picker offers ready-made ones that fit whatever you chose in step 1 — shapes, positions, difficulty levels. And the text field underneath takes anything you type: "Alternate picking only", "Eyes closed", "Standing up", "Bars 17–32". Type it, press Create. Most exercises end up as a mix of both.
Then either Add to Routine or Queue Now to go straight to it.
Two more ways to look at a scale
Down in the picker, just under Full Fretboard, there are two options that change how a shape is drawn rather than which shape it is.
- By Solo String — pick a string and you get the whole scale along that one string, nothing else. Tick a few and each one becomes its own method with its own tempo. It is a good way to learn the neck lengthways instead of only in boxes.
- Ghost Fill — the rest of the scale fades in faintly behind whatever you are working on. Your E shape still stands out, but now you can see where it sits on the neck and what is waiting on either side of it.
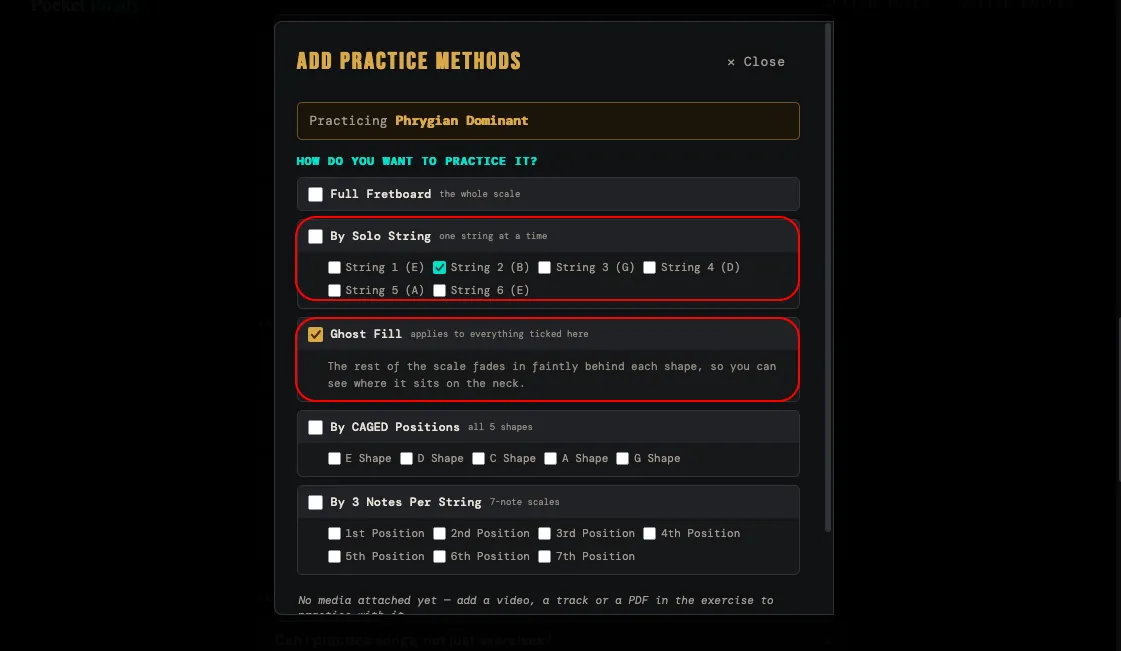
Ghost Fill is not a method of its own. It is a switch that rides along with whatever else you tick in that visit, so you can keep a plain E shape and an E shape with ghost fill as two separate cards. The two work together too — solo a string with Ghost Fill on and you will see that one string lit up against the whole scale behind it.
Ghost Fill needs something to hide. On the full fretboard with no string soloed, every note is already lit, so there is nothing left to fade in and the button quietly tells you so. Pick a shape or a string first, then turn it on.
The practice surface
The middle of the screen, top to bottom.
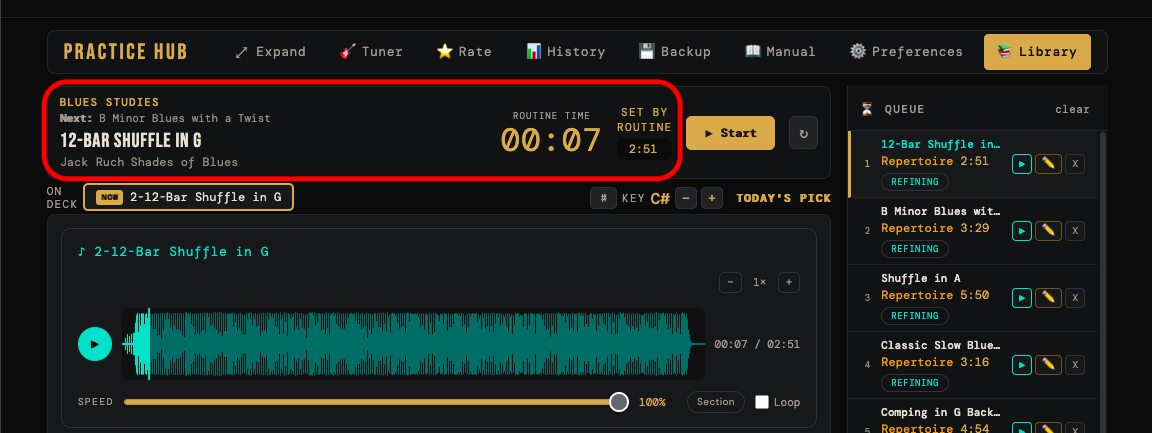
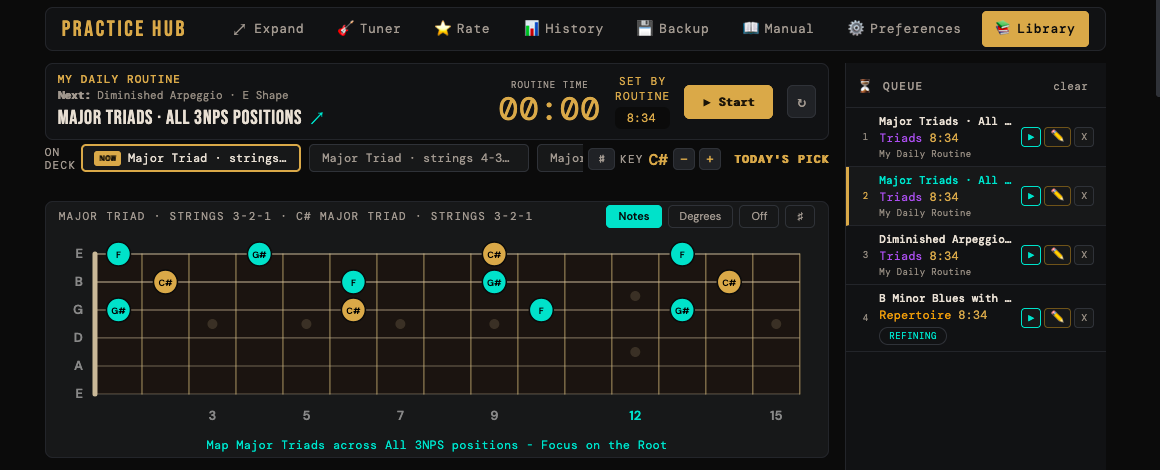
- The routine line. Which routine you are in, and what is coming after this one.
- The exercise name and instruction. The one line you wrote about what to actually do.
- The timer, top right. Count of your routine time, with a Target you can nudge up or down. Start, and the reset arrow next to it. In a guided routine this target is set for you.
- The on-deck strip. Every method in this exercise, in a row, with the current one marked. Tap any to jump. The rest sit there so you always know what is left.
- The key control. Today's key, a ♯/♭ toggle, and − / + to move it. The key is global for the session, not per-method — change it and every board on the screen follows.
- The stage. The big area in the middle. Whatever this method needs shows up here: a fretboard, an ear-training question, a drill, a PDF, a video, or the audio player.
The method cards
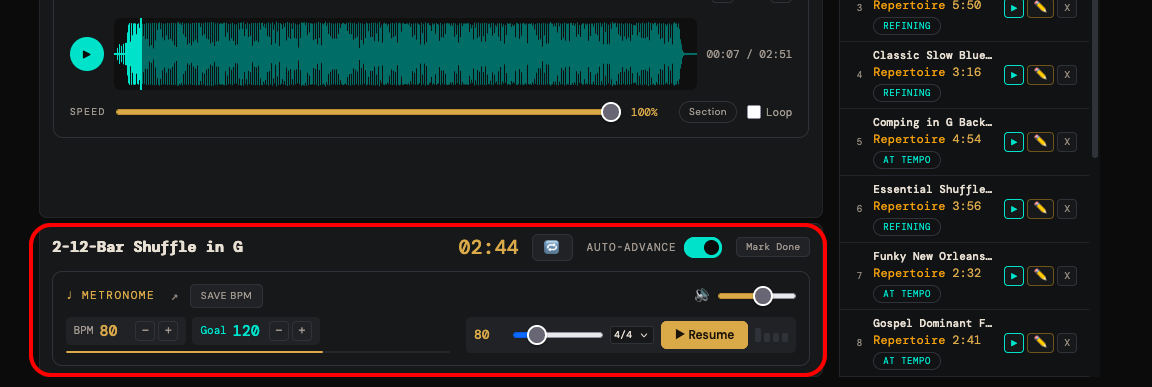
One per method, below the stage. Each card has:
- BPM and Goal with steppers, and a progress bar between them
- A metronome button with a beat light
- Its own timer
- A done tick
- An auto-advance toggle
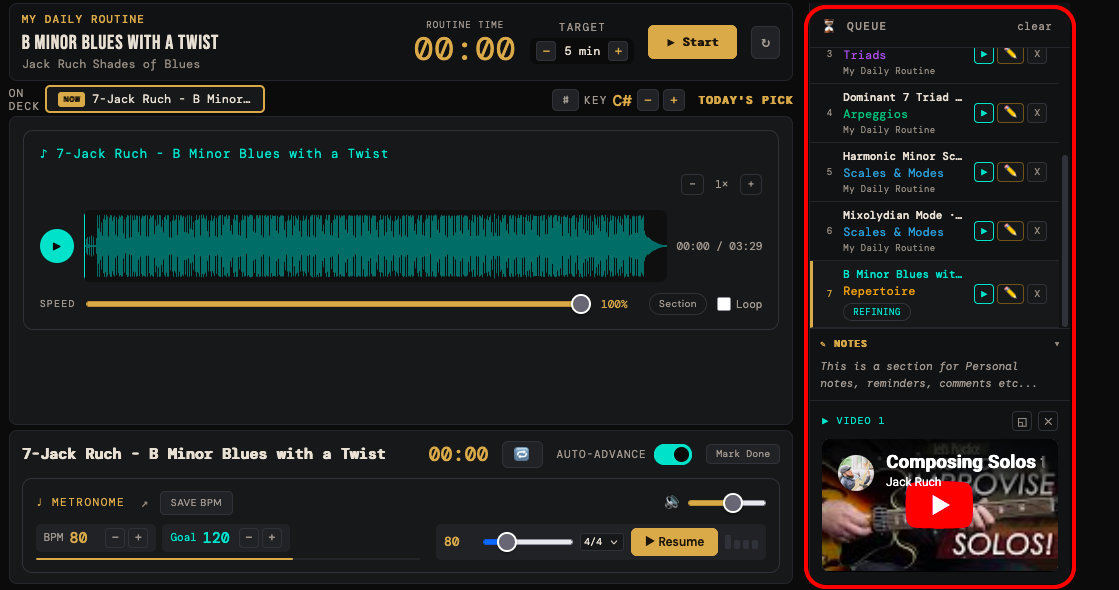
The sidebar, on the right. Your Queue, your personal Notes for this exercise, and the backing-track player — which keeps playing underneath everything, including when you move to the next exercise.
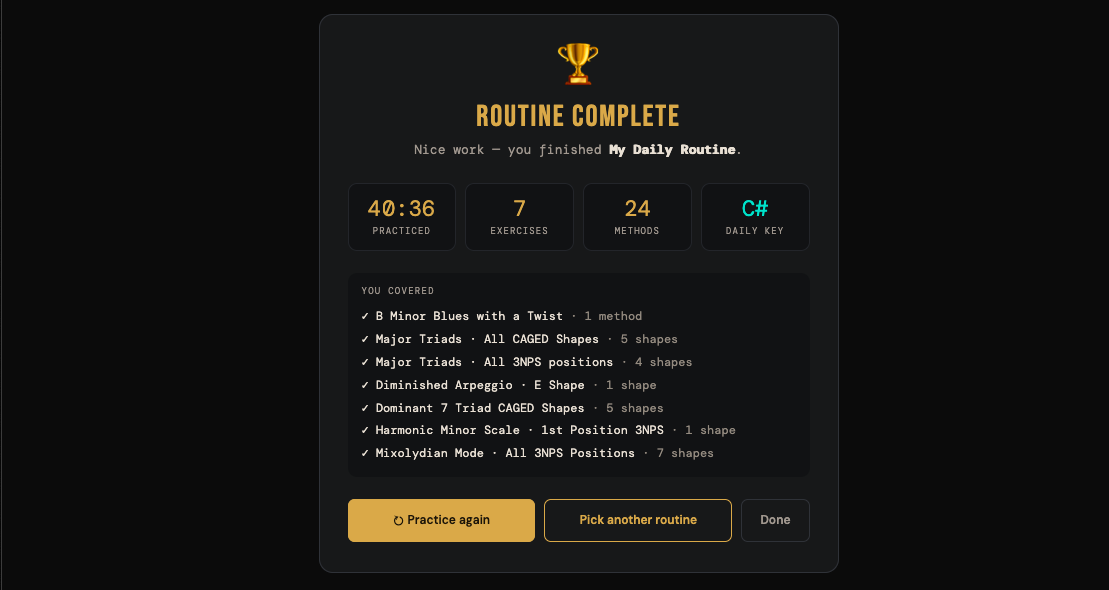
When you finish, you get a summary: time practiced, how many exercises and methods, today's key, and a list of everything you covered. Then practice it again, pick another routine, or call it a day.
Routines and guided practice
A routine is an ordered set of exercises. Build one, queue it, and the Hub walks you through it.
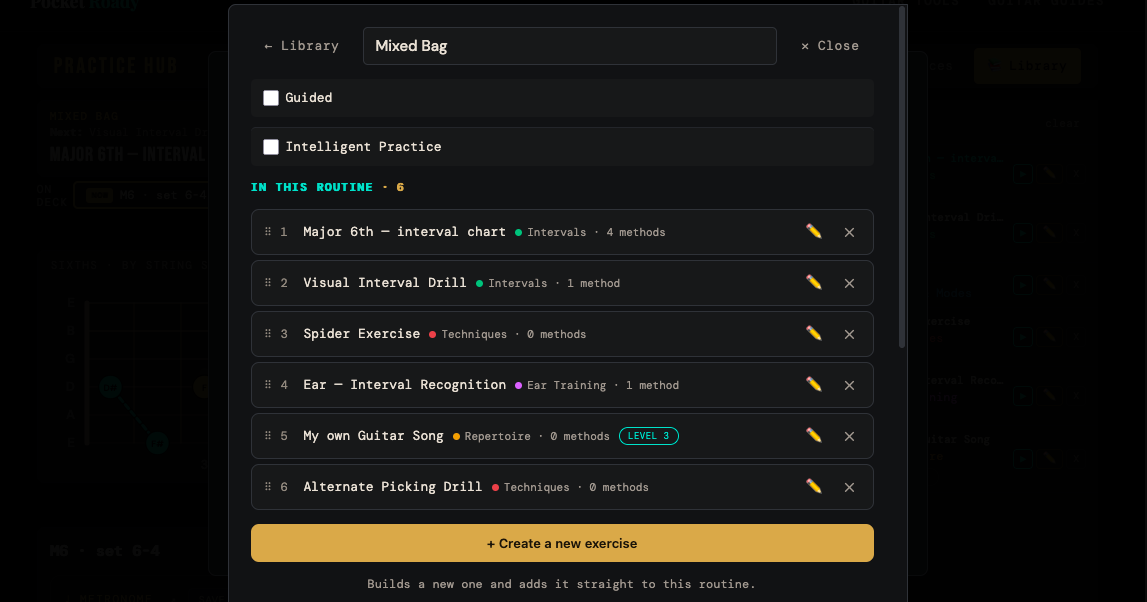
Building one. Library → + New Routine. Name it, then either create new exercises inside it or search existing ones and add them. Drag to reorder.
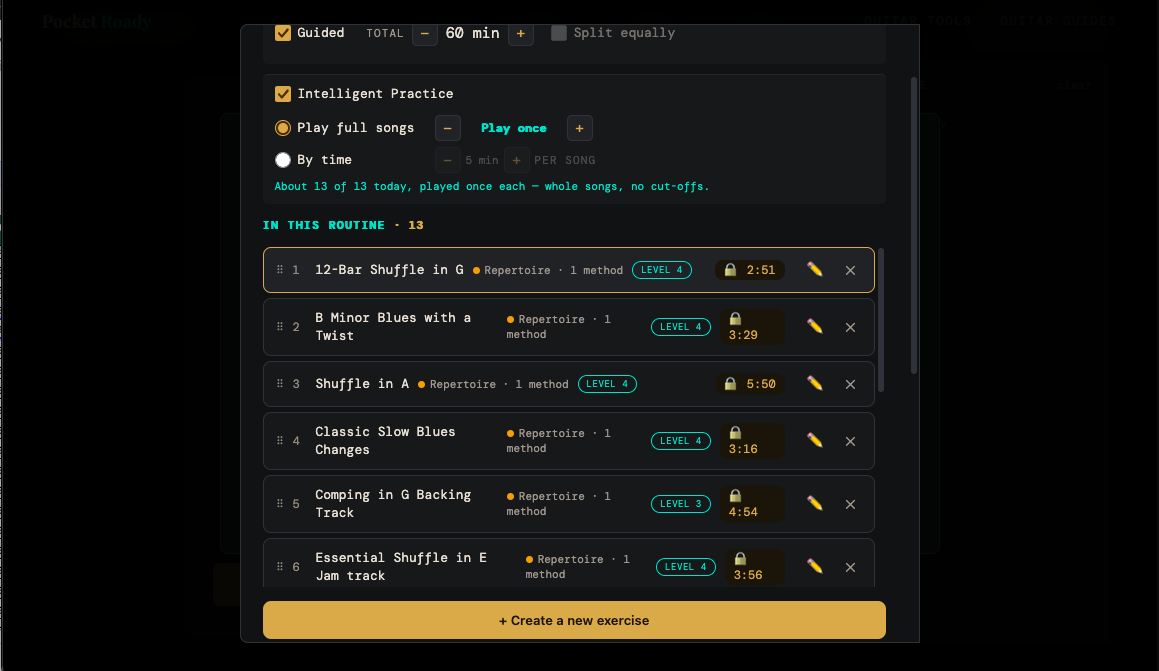
Guided. Tick Guided and set a total time — say 30 minutes. Then either:
- Split equally, and the Hub divides the time across everything in the routine, or
- Set the time on each exercise yourself. Change one and the others rebalance so the total still adds up.
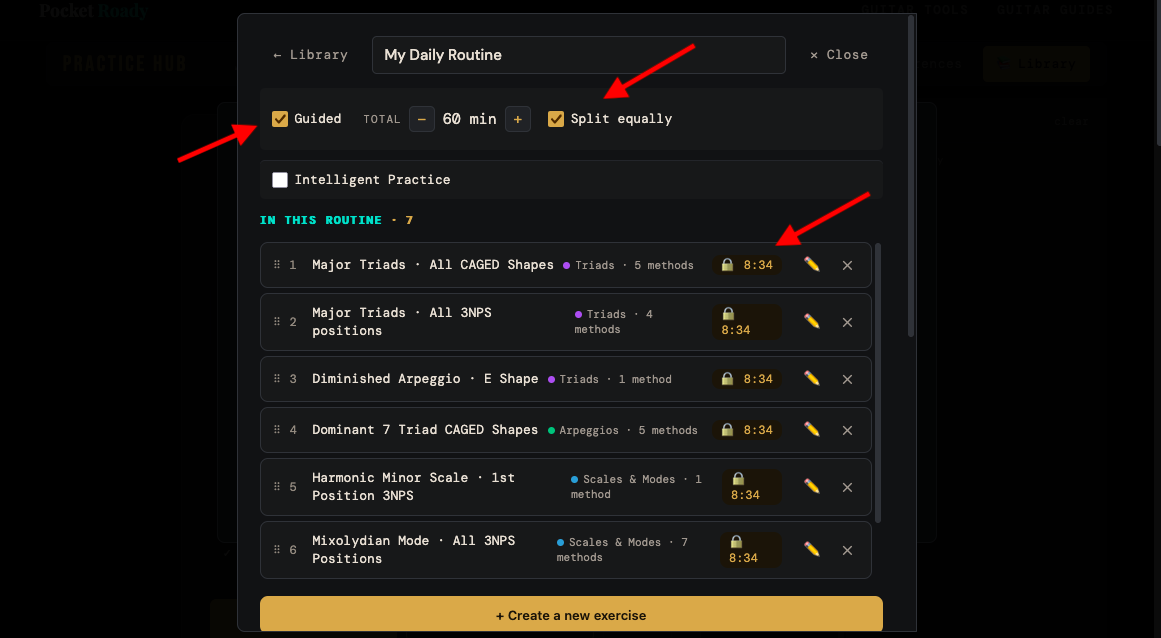
Each exercise's slice is then divided among its methods, so the countdown you see on a card is that method's actual share.
Auto-advance. When a slice runs out, the Hub moves you on. This is on by default, and it is the point of guided practice — it takes you to the thing you would have skipped. You can turn it off globally in Preferences, or per method on the card.
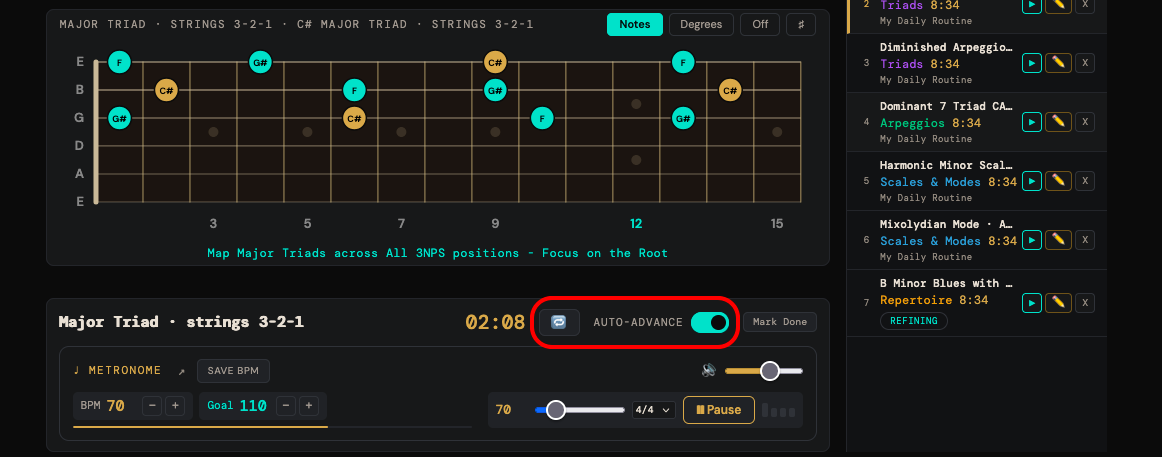
Loop. If you would rather stay put, the loop button restarts the slice instead of advancing.
The chime. So you are not watching the screen. By default you get a soft heads-up ten seconds before a handover, then the handover itself. It is a bell with a long tail — you will not mistake it for a downbeat, and you will hear it over a backing track. You can set it to handover-only or off, and there is an optional 5-4-3-2-1 blip if you like a countdown.
Start smaller than you think. Twenty to thirty minutes and four or five exercises is a routine you will actually finish. Long routines look impressive and get abandoned.
Putting your own practice in
Most of what you practice will not come from a menu. It will come from a lesson, a video, a book, or something you worked out yourself. Here is how that goes in.
Pick the right kind. Under Choose what to practice, past the scales and tools, there are four plain options:
- Repertoire — a song you are learning
- Exercise — a drill from a lesson, a book, a video
- Technique — economy picking, hybrid picking, bends, vibrato
- Other — anything that does not fit the first three
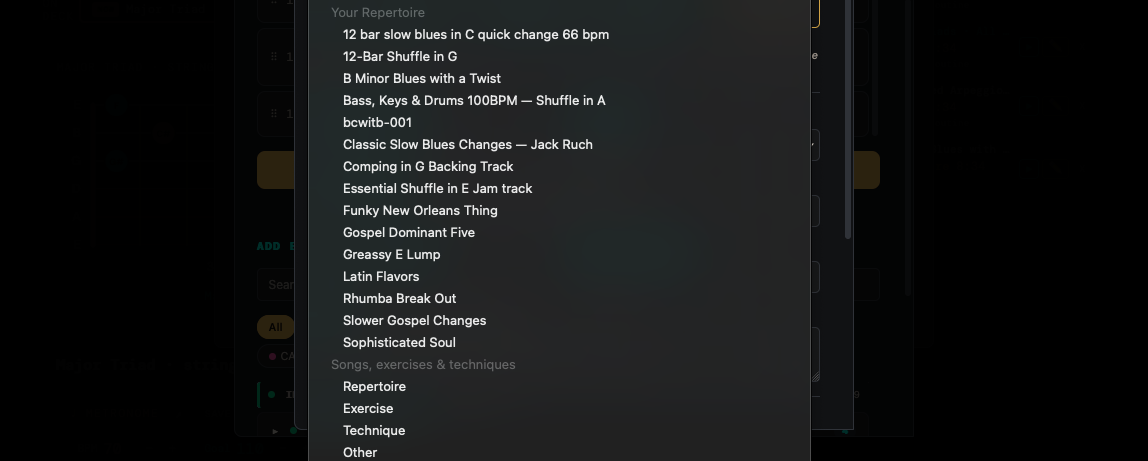
None of these draw a fretboard, and that is on purpose. They are for practice the Hub does not need to illustrate — it just needs to hold it, time it, and remember your tempo.
Then describe it in methods. This is where your own practice gets its structure. A picking drill might be "Down-up", "All downstrokes", "Triplets". A song might be "Intro", "Verse", "That bar I keep missing", "Full run-through". Each one gets its own tempo and its own goal, which is how you find out that the chorus has been sitting at 90 for three weeks.
Fill in the details that help you later
- Instructions — one line on what to actually do. It shows above the board every time you land on this exercise, so write it for the version of you who is tired on a Thursday.
- Artist / Author and Course / Source — where it came from, so you can find it again.
- Notes — your own reminders, in the sidebar while you practice. Fingerings, what your teacher said, what went wrong last time.
- Category — how the Hub sorts everything. Ten come built in; add your own with any of ten colours under Library → ⚙ Categories.
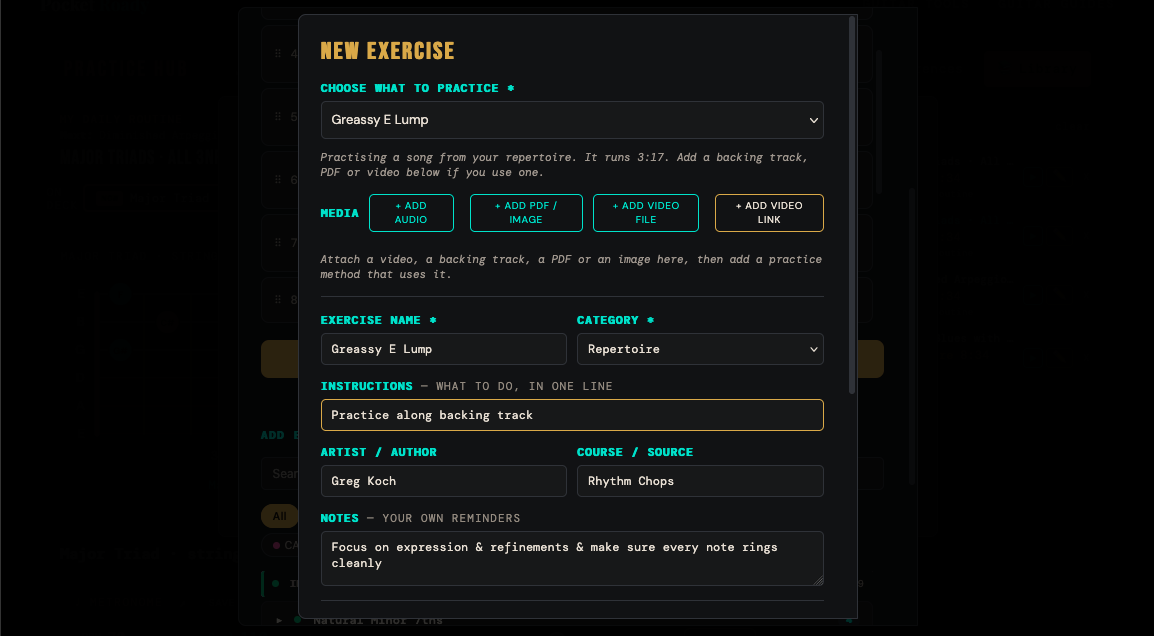
Attach whatever it needs. A PDF of the tab, a video of the lesson, the backing track. Chapter 8 covers media in full.
Mix freely. There is nothing separating your own exercises from the built-in ones — a routine can hold your teacher's picking drill, a Mixolydian board, an ear-training block and a song, in whatever order you like.
The five tools inside
Everything so far works whether or not you ever touch these. But they are built in, they are free, and they cover a lot of ground — so when you want something new to work on, or you want to shore up a weak spot, start here. Pick one under Choose what to practice and the tool shows up on the stage.
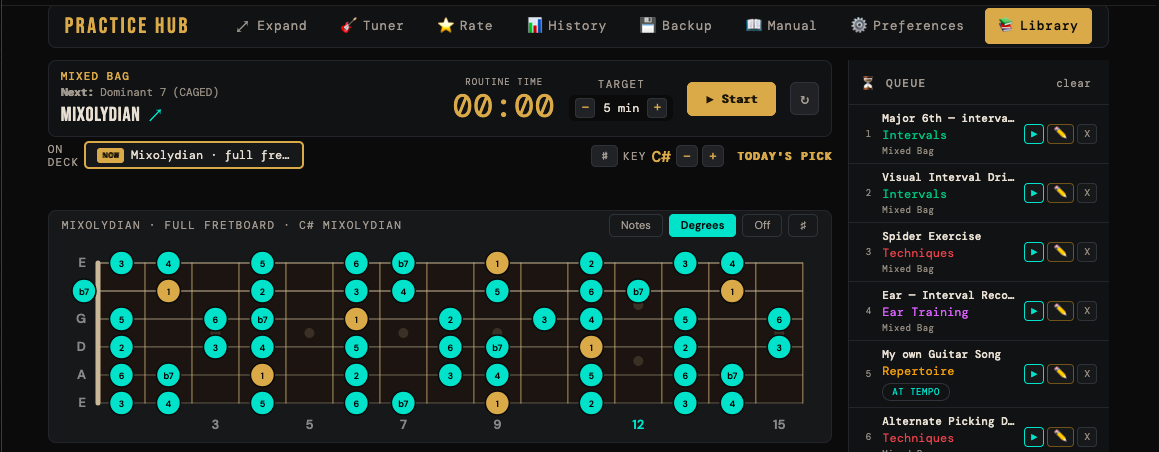
Scale & Arpeggio boards. 31 scales, modes and arpeggios. For each one you can practice the full fretboard, any of the five CAGED shapes, four string sets, seven three-notes-per-string positions, or a four-notes-per-string run. Dot labels can show note names, scale degrees, or nothing at all when you want to test yourself.
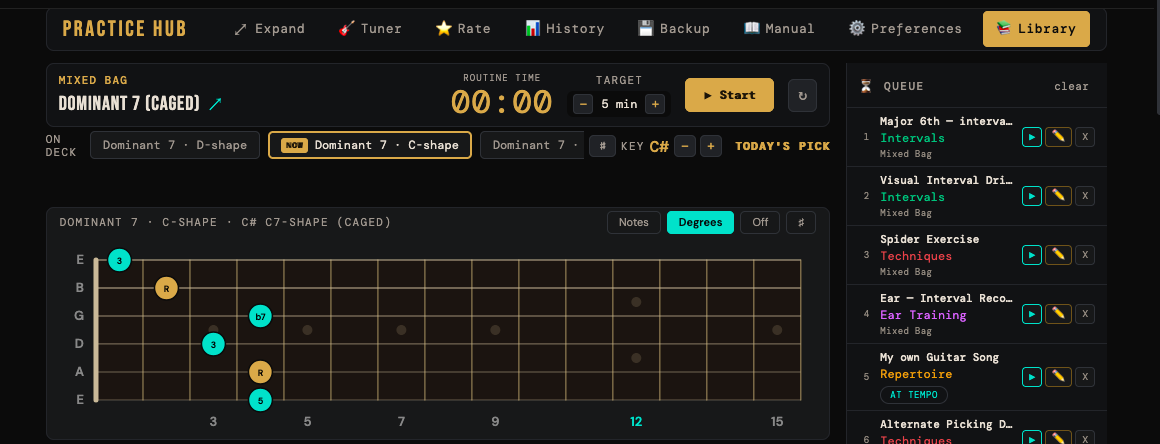
CAGED Navigator. 20 chord qualities as actual voicings you play — not note-maps you run. Movable shapes, plus string-set voicings grouped by their bass string.
Interval Finder. All 12 intervals, minor 2nd through the octave, tritone included. Three ways to see each one: the full fretboard, by position with the root on each string, or by string set.
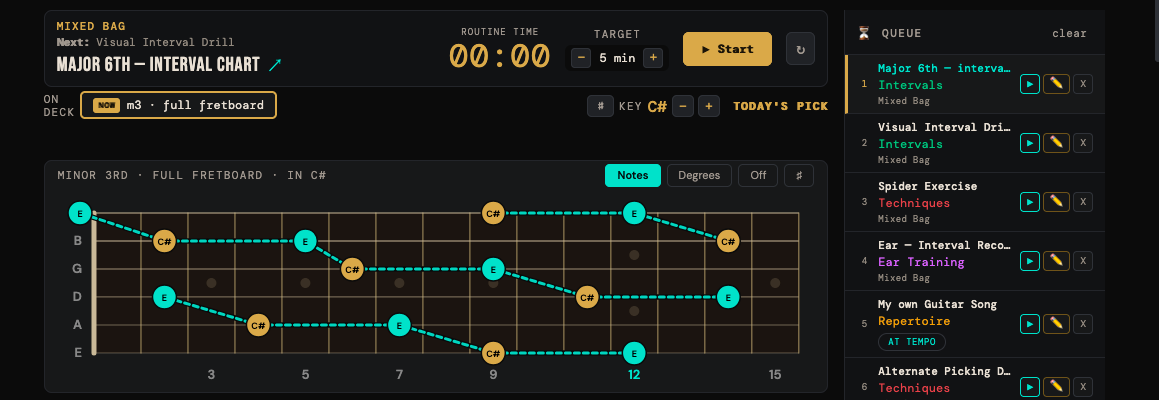
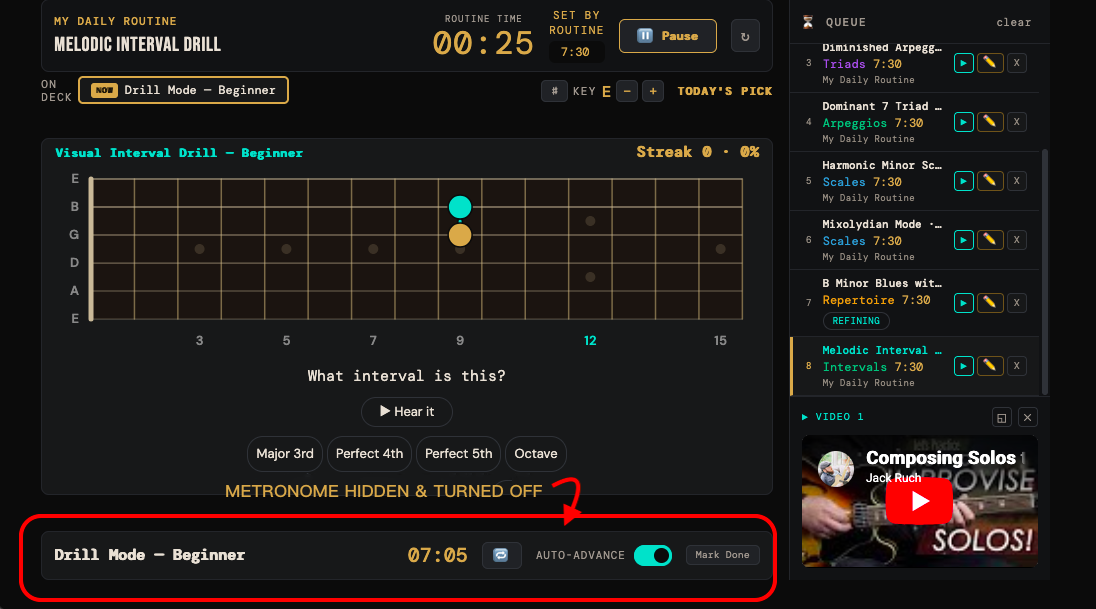
Interval Drills. Two flavours, four difficulties each. Visual asks you to name the interval by sight; Melodic plays it and asks you to name it by ear. Beginner starts with four intervals and Expert opens up all twelve.
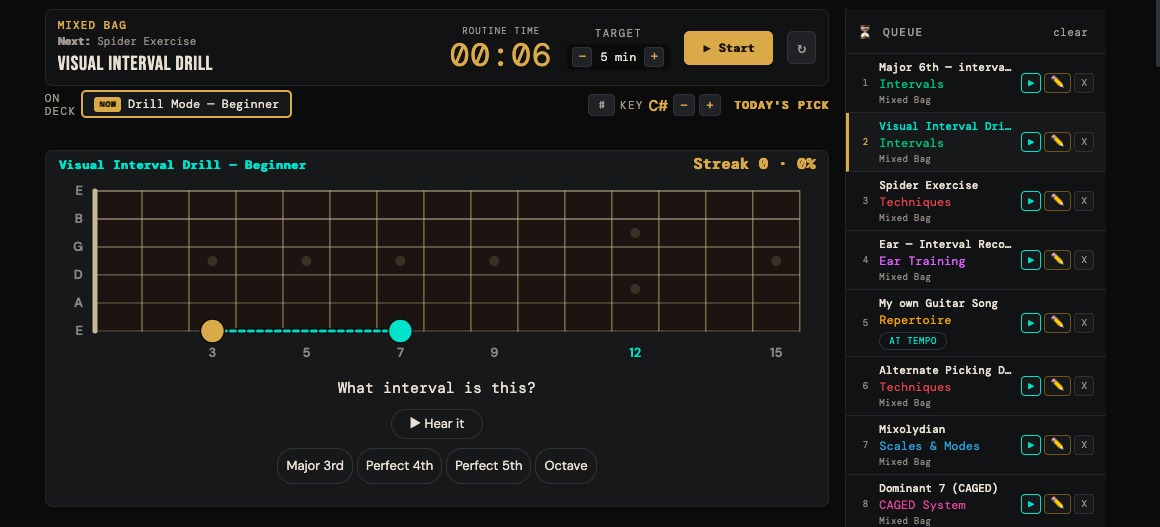
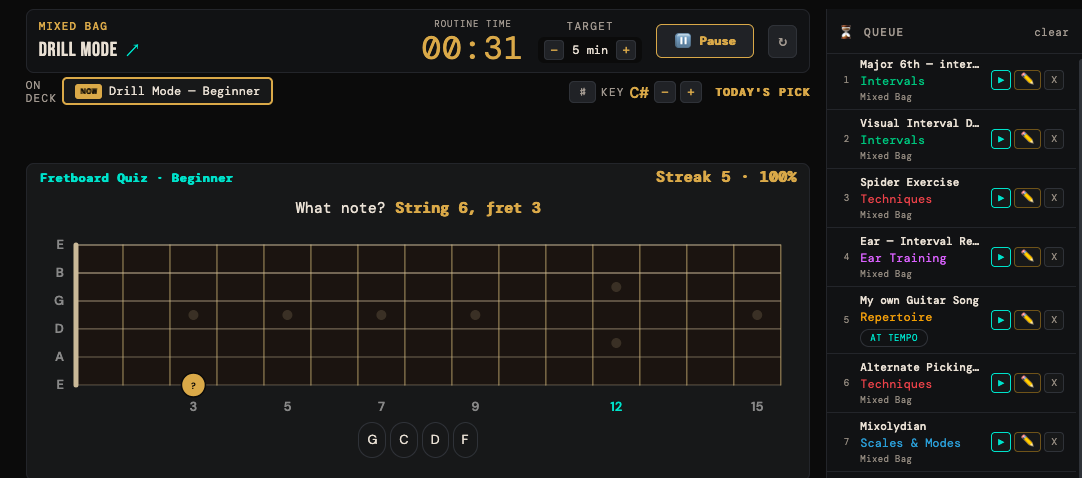
Fretboard Note Finder. Root Finder lights up every position of today's key. Drill Mode quizzes you, with four preset scopes:
| Preset | Strings | Notes | Frets |
|---|---|---|---|
| Beginner | Low E + A | naturals | 0–7 |
| Intermediate | all six | naturals | 0–7 |
| Advanced | all six | naturals | 8–15 |
| Expert | all six | everything | full neck |
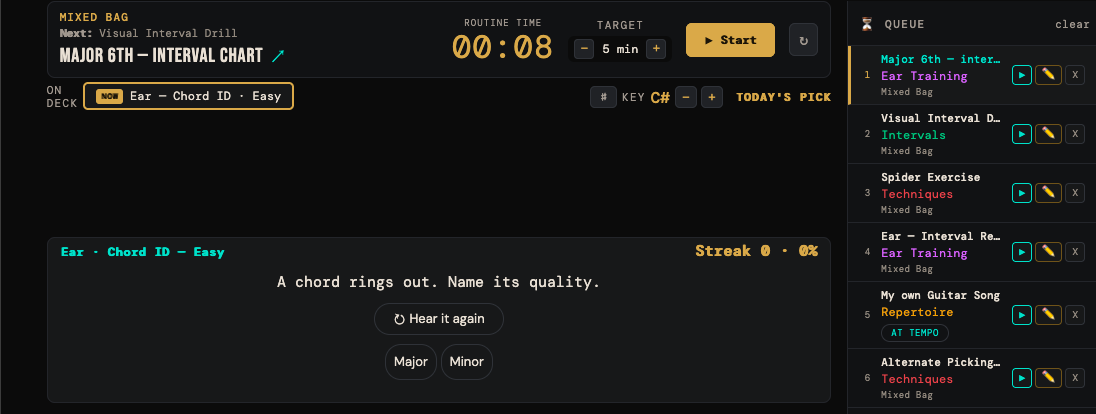
Ear Trainer. Four modes — intervals, note ID, chord ID, scale degrees — each with Easy, Medium and All. Pitch Match is not here; it needs your microphone, which is a different kind of interruption mid-session. It is on the Ear Trainer's own page.
And the starter set. On top of the tools, the Hub ships with a large batch of ready-made exercises already built out of them — hundreds of them, covering scales, triads, arpeggios, intervals, CAGED, ear work and jam ideas. Browse the Library, take what is useful, ignore the rest, edit any of it.
The click stays quiet on the drills. For the interval drills and the ear work, the metronome does not start on its own. A click while you are trying to hear something is the wrong tool. The button is still there if you want it.
Songs, backing tracks and the audio player
Your repertoire is the list of songs you are working on. Songs behave like anything else you practice — they show up in "Choose what to practice", and you build methods on them the same way.
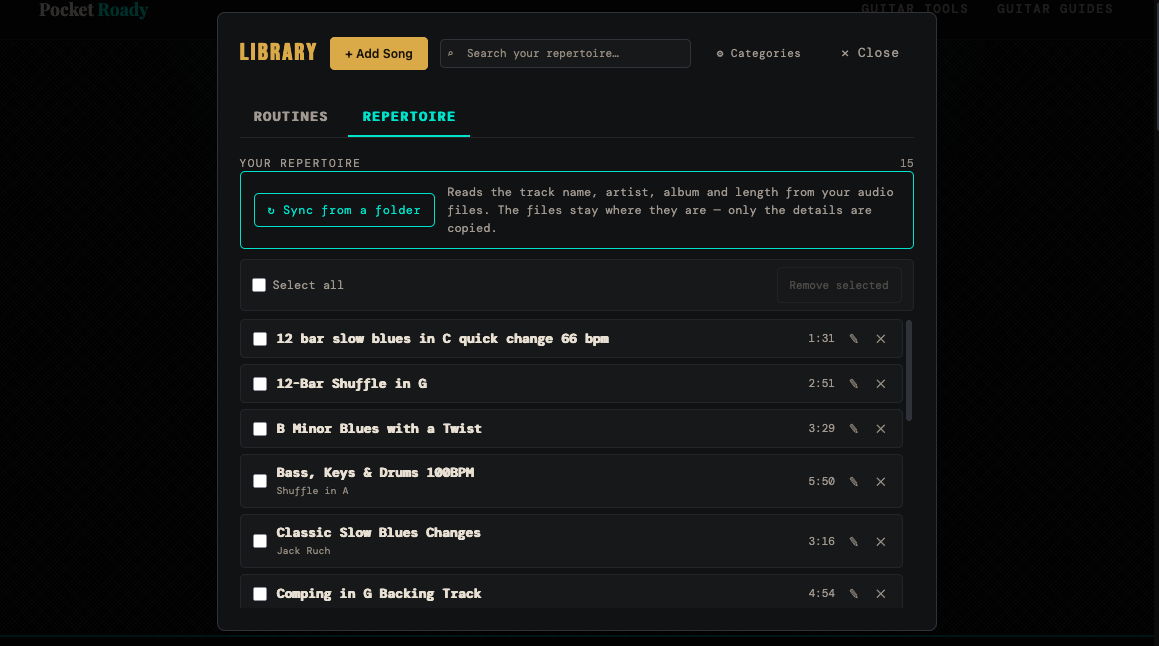
Adding songs the quick way. Library → Repertoire → Sync from a folder. Point it at a folder of audio files and it reads the track name, artist, album and length out of the files themselves. The files do not move and nothing is copied — only the details.
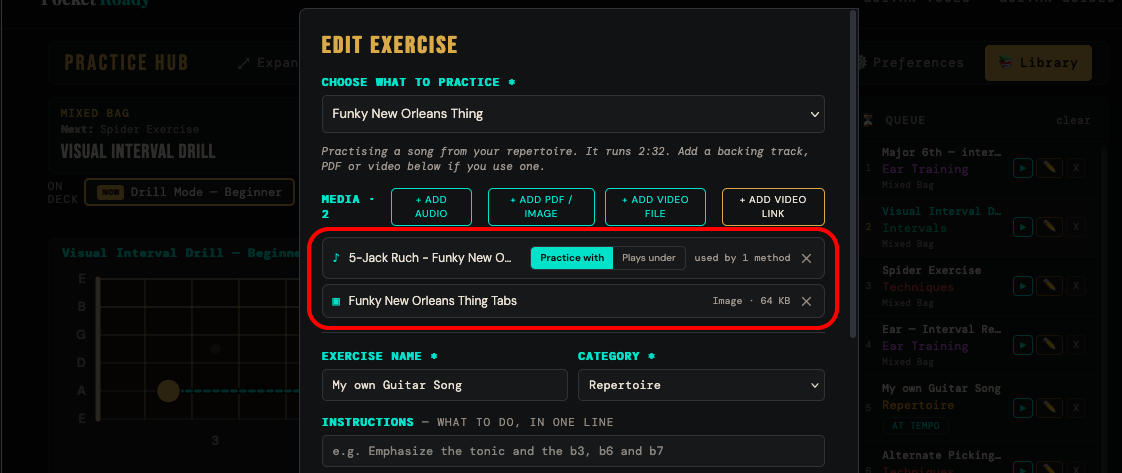
Attaching media. In the exercise form: audio, a video file, a YouTube link, a PDF or an image. A YouTube link can carry a start timestamp; a PDF can carry an opening page. Then add a method that uses it.
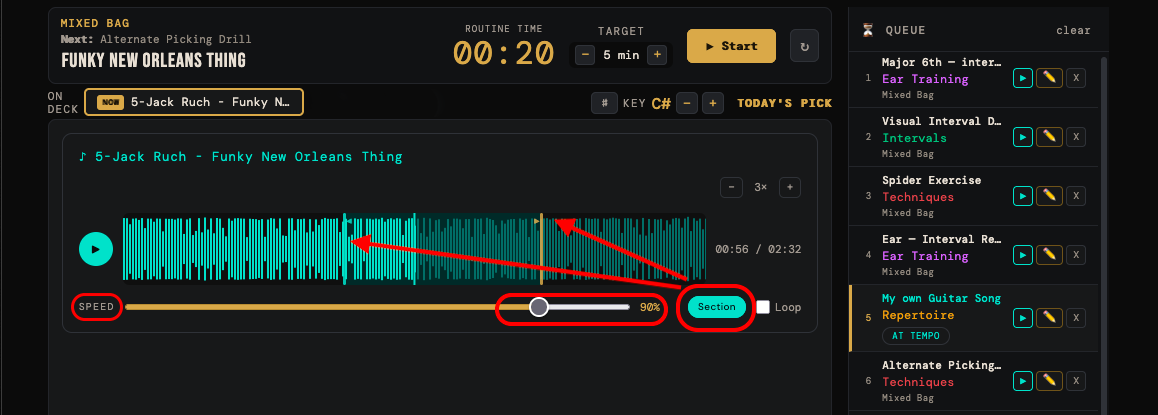
The audio player. Built for learning parts, not for listening:
- A waveform you can zoom into
- Speed from 50% to 100%, in steps, with the pitch held steady
- Loop
- Section — drag the two markers on the waveform to the bit you keep getting wrong, and it loops just that
Your section, speed and loop setting are remembered for that file. Come back next week and it is still set the way you left it.
The backing-track player in the sidebar is separate on purpose. It plays underneath the practice and survives every method change and every exercise change — so a groove can run through the whole session while you move around it.
Intelligent Practice
This is for the problem of a repertoire that quietly rots. You keep playing the three songs you like and the other twelve drift away.
Rate where you are. For each song, pick a stage:
- Section by section
- All sections, slowly
- All sections, at tempo
- Expression and refinement
- Stage ready
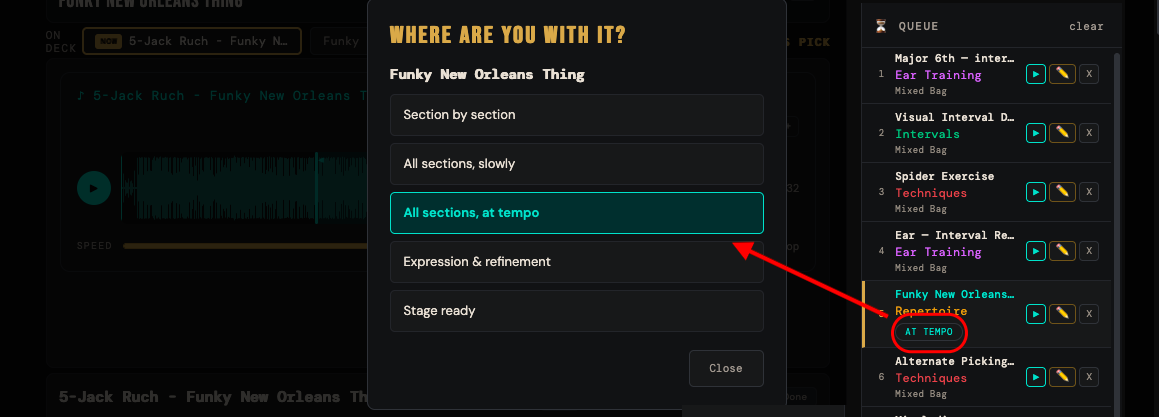
These are stages of learning a piece, not a grade. "Stage ready" is not a finish line — it just means it is ready if someone asked.
Turn it on in a routine and tick Intelligent Practice. The Hub then picks songs for you, putting the shakiest first — but a polished song you have not touched in a month climbs the list too. That is what makes it maintenance rather than a weakness queue.
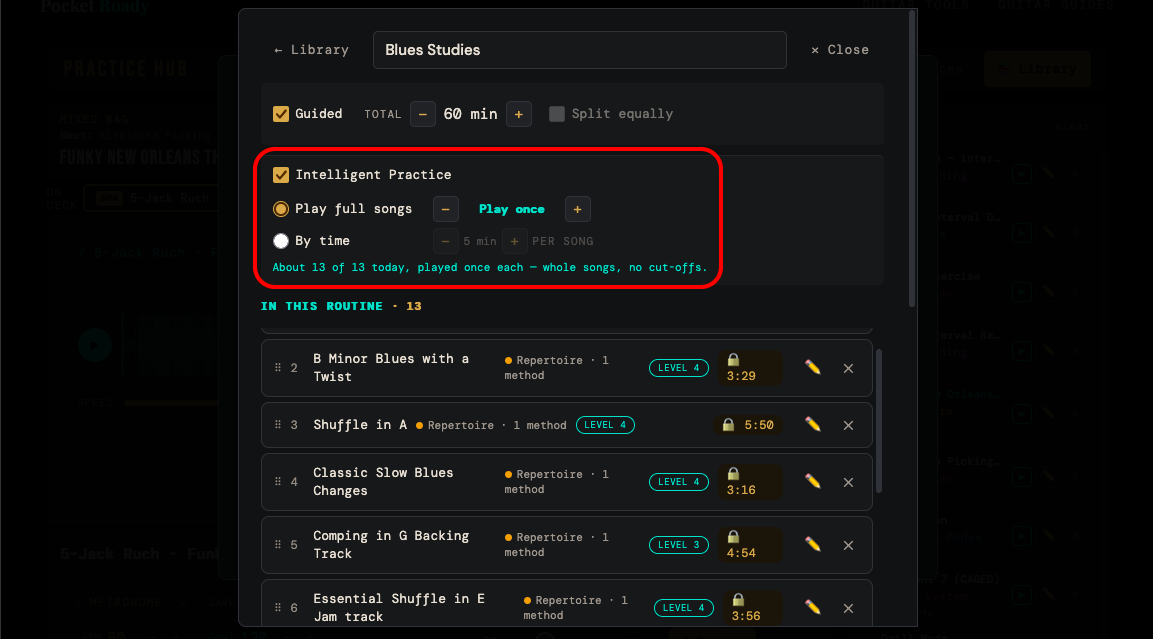
Two ways to run it: play full songs (you set how many times through), or by time (you set minutes per song).
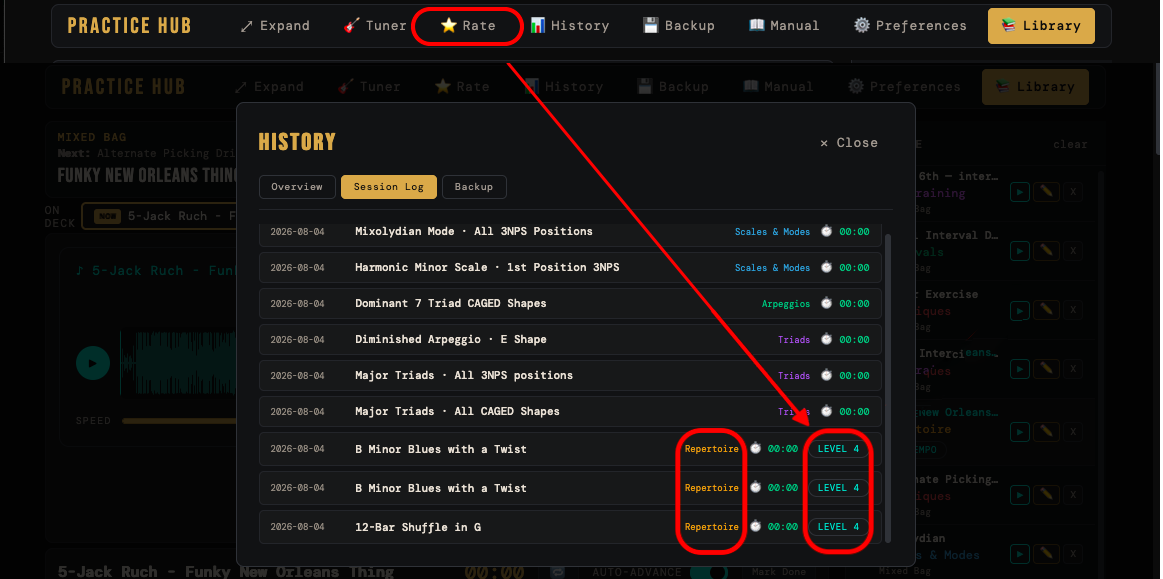
Rating as you go. After a session, a ⭐ Rate button appears in the header for any song you practiced but have not rated. It is also on every line in the session log. It takes one tap, and it is what keeps the whole thing honest.
Preferences
⚙️ in the header. Worth five minutes once, then you can forget it.
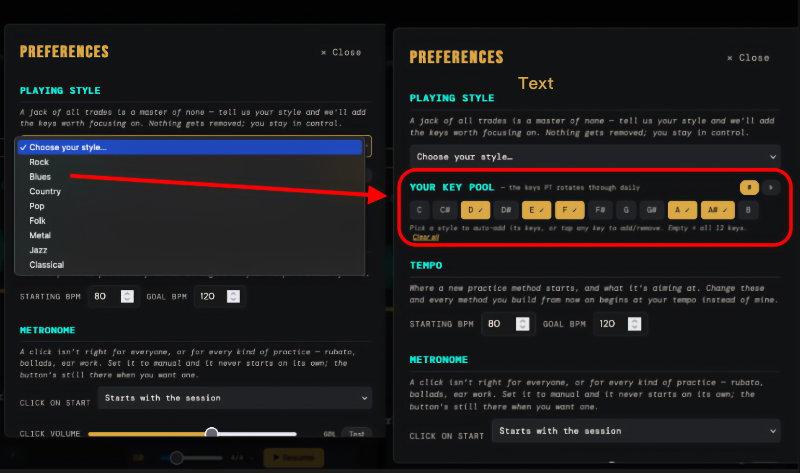
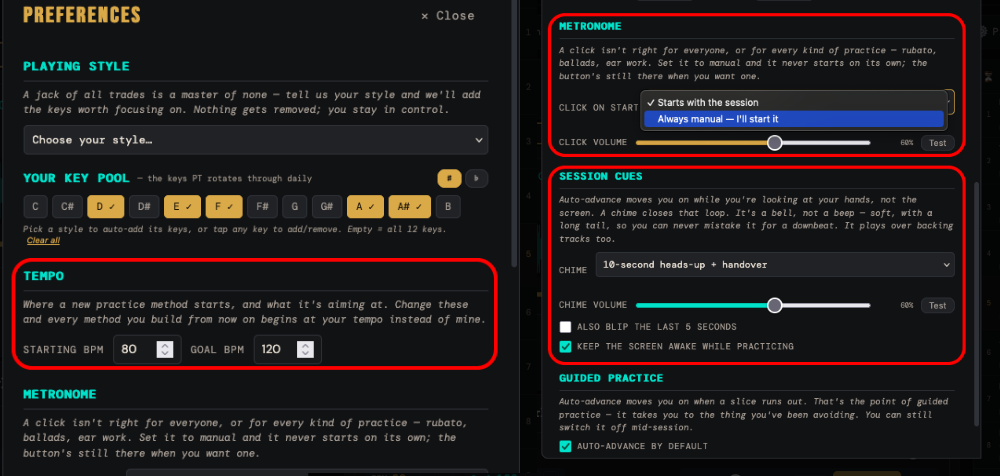
Playing style and key pool. Pick a style and the Hub adds the keys worth focusing on — Blues gets you E, A, D, B♭ and F; Jazz gets C, F, B♭, E♭ and A♭. Nothing is ever removed; you can tap any key to add or drop it yourself. Leave the pool empty and it rotates all twelve. This pool is what the daily key is drawn from.
Tempo. Where a new method starts and what it is aiming at. Defaults are 80 and 120. Change them and everything you build from then on begins at your numbers instead of ours.
Metronome. Set the click to manual and it never starts on its own — right for rubato, for ballads, and for anyone who finds a click a nag. Set the volume with the Test button so you are not guessing.
Session cues. The chime, its volume, and the optional last-five-seconds blips. Test plays both jobs so you can hear the difference.
Keep the screen awake. On by default. Your screen stays on while a session is running.
Auto-advance by default. Covered in Chapter 5.
History, backup, and moving to a new device
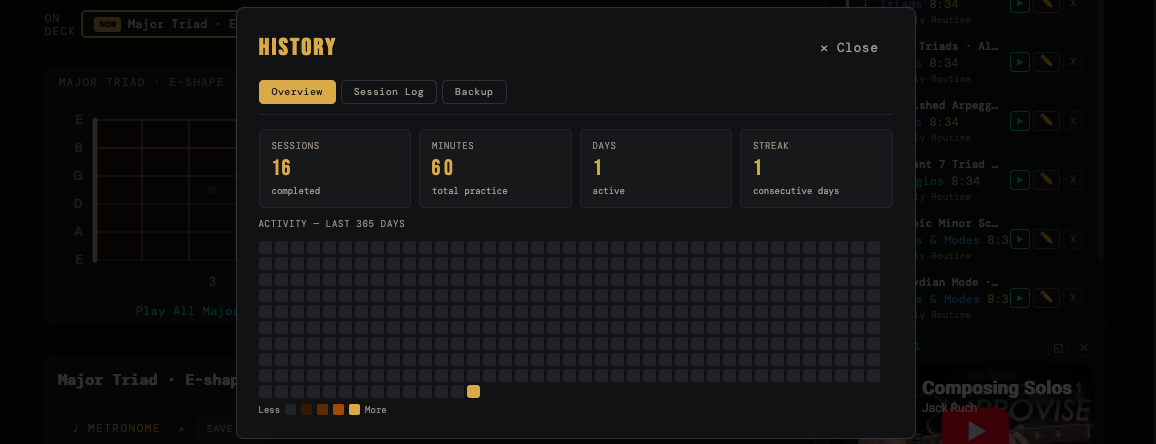
History (📊 in the header) has two tabs.
Overview: sessions completed, total minutes, days active, your current streak, and a year of activity as a heatmap. It is a nudge, not a judgement — a light week is a light week.
Session log: your last hundred sessions, with a Rate button on every song.
Backup — please read this one
Everything lives in your browser. That is what makes it private and account-free, and it is also what makes it fragile. Clear your browsing data and it is gone.
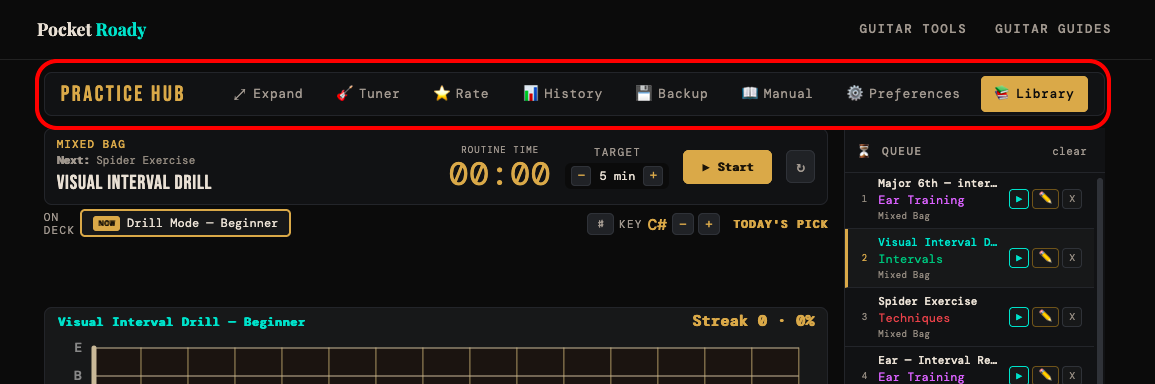
💾 Backup in the header gives you:
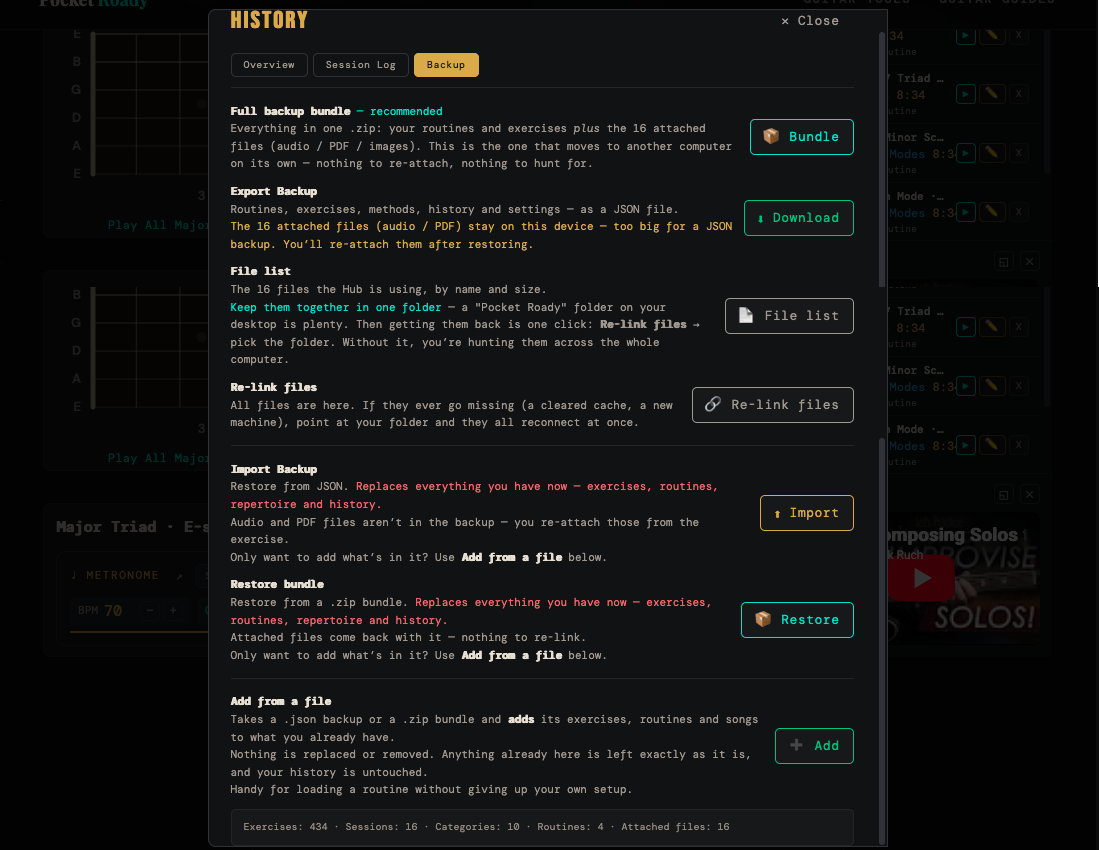
- Export data — a single file with all your routines, exercises, repertoire and history.
- Export bundle — a zip with that data plus a list of every file (backing tracks, PDFs and so on) your setup expects, so you know what to keep together.
- Import Backup and Restore bundle — bring either one back, here or on another machine. Both replace what is in the Hub with what is in the file.
- Add from a file — takes the same two file kinds but adds what is in them instead. Nothing already in the Hub is replaced or removed.
Replacing versus adding
These are two different jobs and it is worth knowing which one you are doing.
Import Backup and Restore bundle replace everything. Your exercises, routines, repertoire and history are all swapped for what is in the file. That is exactly right when you are recovering from a mistake or setting up a machine you have not practiced on yet — you want the file to win. It is the wrong choice if you already have practice in the Hub that you would like to keep, because anything added since that backup was made goes with it.
Add from a file adds and never removes. It brings in the exercises, routines and songs that are not already here and leaves everything else exactly as it is — your history, your tempos, anything you have renamed or edited. If a bundle is involved, the attached files come along too. This is the one to use when you just want a routine from somewhere else without giving up your own setup.
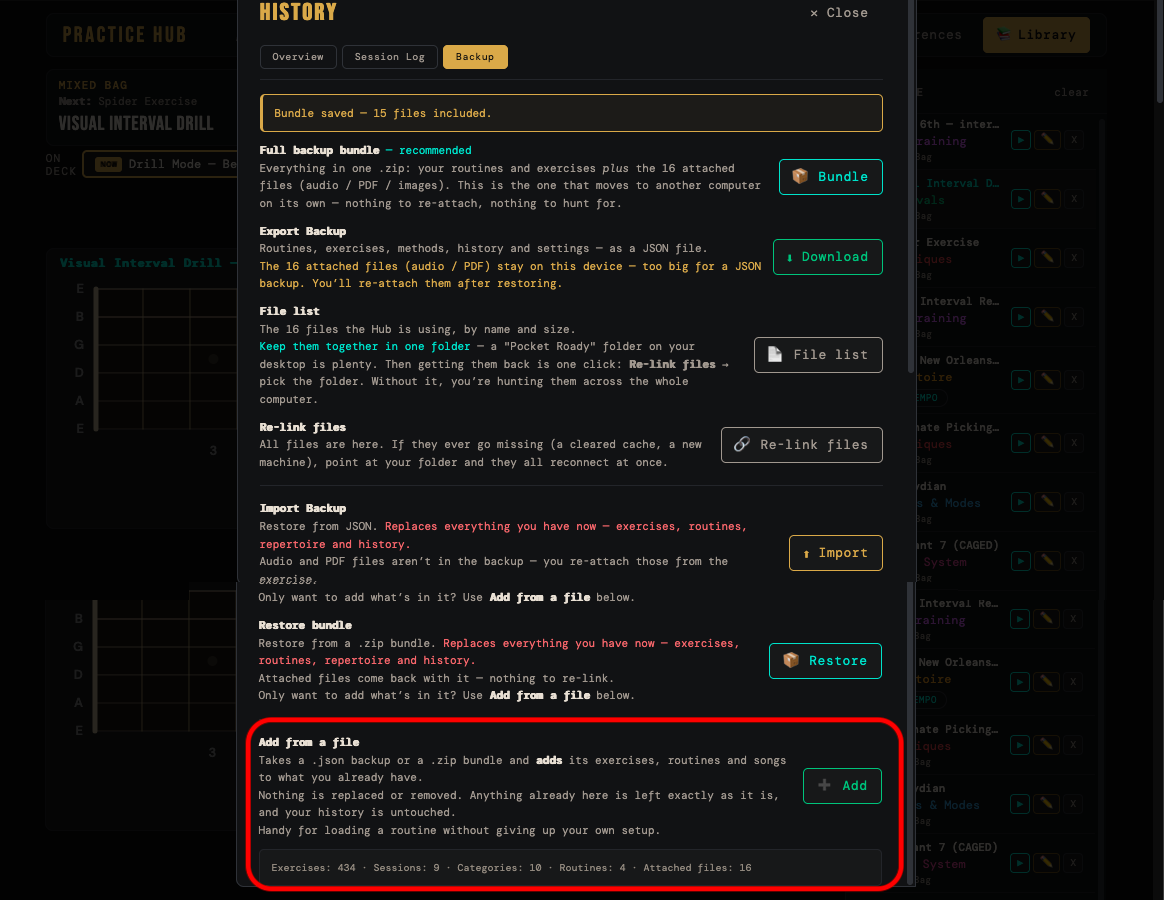
When in doubt, add. Adding can be undone by deleting what came in. Replacing cannot be undone at all. If you are not sure which you want, use Add from a file — running it twice changes nothing, so there is no harm in trying it first.
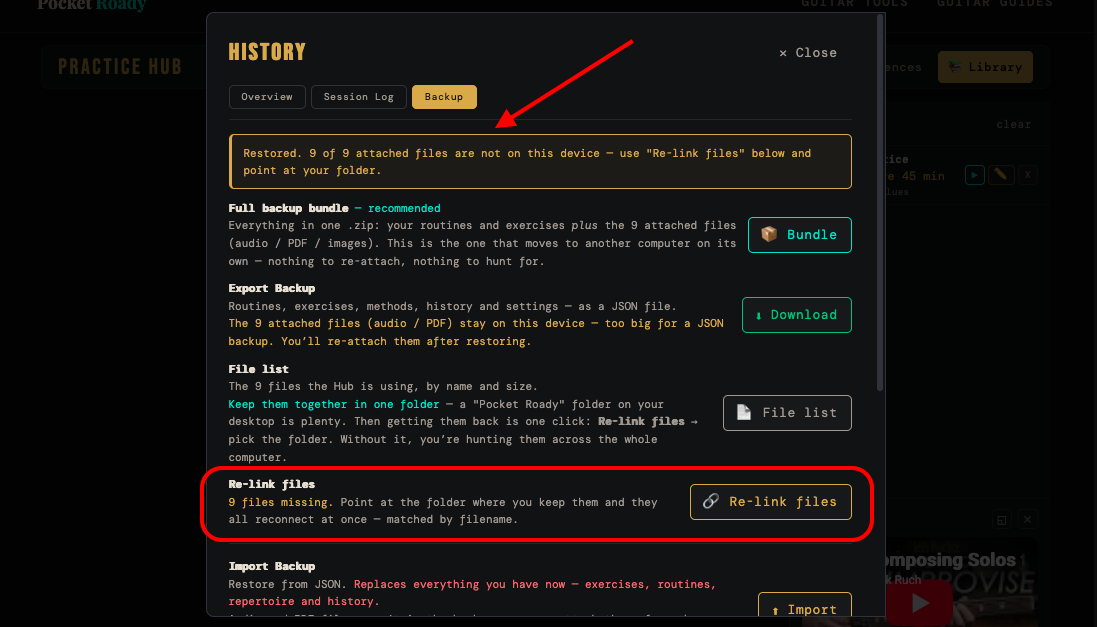
About your files. The Hub points at your audio and PDFs; it does not own them. So a backup restored on a new computer knows a track is called for but cannot find it yet. The Backup tab tells you exactly which files are missing and who is asking for them, and Re-link folder lets you point at a folder to reconnect them in one go.
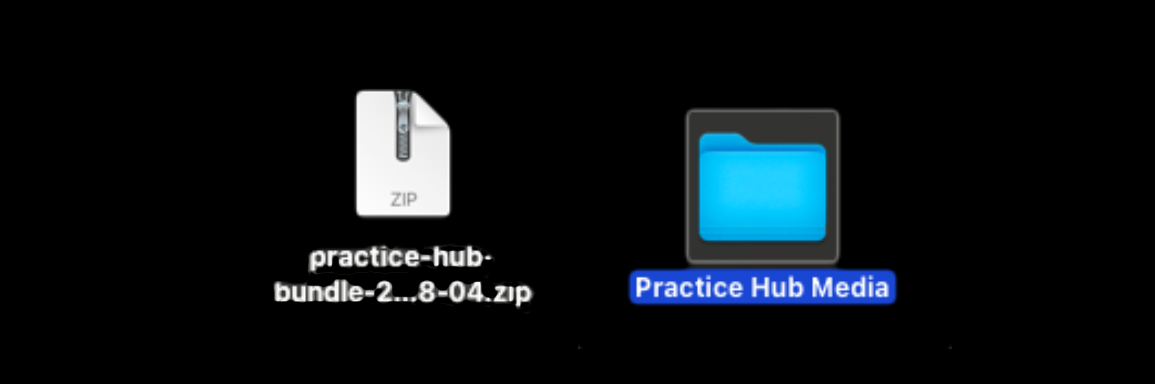
A simple habit. Create a Practice Hub media folder where you keep all the files the Hub uses, and export. That way Re-linking your media will be a breeze — or zip everything including media by using the Bundle option — Do any of these two options after any session where you built something. It takes three seconds and it is the only thing standing between you and starting over.
Shortcuts and small things
| F | Focus mode on and off |
| Esc | Leave focus mode |
| On-deck chip | Tap to jump straight to that method |
| 🎸 Tuner | Opens in a new tab — your session keeps running |
| ⭐ Rate | Appears when you have songs waiting to be rated |
| Notes panel | Your own reminders, per exercise — click the header to collapse it |
| Mark Done | Marks the method as done and moves you to the next one |
Categories. Ten to start with — Triads, Arpeggios, Scales & Modes, Techniques, Repertoire, CAGED System, Pentatonic, Ear Training, Fretboard Navigation, Intervals. Add your own with any of ten colours under Library → ⚙ Categories.
That is the whole manual. The quickest way to make it stick is to open the Hub, put one thing you are already practicing into it, and start.